Table of Contents:
Overview:
Welcome to the first installment of our DIY Air Pollution Monitor series! In this journey, we’re diving deep into the fascinating realm of air quality monitoring by interfacing the SDS011 Air Quality Sensor with the ESP8266 microcontroller.
As concerns about air pollution grow globally, understanding and tracking air quality become paramount. This comprehensive guide will walk you through the step-by-step process of connecting the powerful SDS011 sensor with the versatile ESP8266, creating a cost-effective and efficient air quality monitoring system.
In Part 1, we’ll set the stage by introducing the components, outlining the essential tools you’ll need, and providing a clear roadmap for the project ahead. Whether you’re a seasoned DIY enthusiast or just beginning to explore the world of electronics, join us on this exciting venture to build your own air pollution monitor and gain valuable insights into the air you breathe. Let’s embark on this technological adventure together!
Video Tutorial: How to Interface SDS011 Air Quality Sensor with ESP8266?
Required components:
1. Breadboard, (Buy from Amazon)
2. ESP8266 Module (Buy from Amazon)
3. SDS011 Sensor (Buy from Amazon)
4. connecting wires (Buy from Amazon)
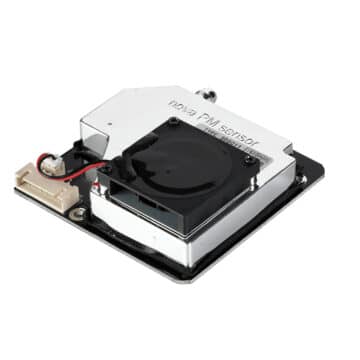
Overview: SDS011 Sensor
The SDS011 stands out as a renowned air quality sensor, designed to measure particulate matter in the air. Its functionality is rooted in the principle of laser scattering.
The Air will enter from Particle Inflow nozzle and then comes out from the Particle outflow nozzle. there will be a Laser Diode and also a photodiode inside the sensor. when particles in the air scatter the laser light, this deflection is then detected by a photodetector. Notably, this sensor is adept at detecting particles of sizes 2.5µm and 10µm, often referred to as PM2.5 and PM10.
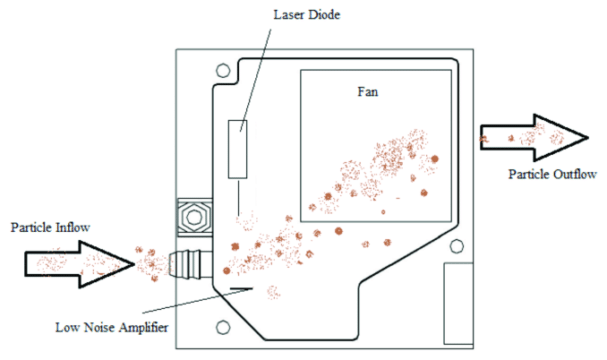
It’s worth noting that these readings are pivotal indicators of environmental pollution. Elevated PM values pose significant health risks, especially concerning the respiratory system.
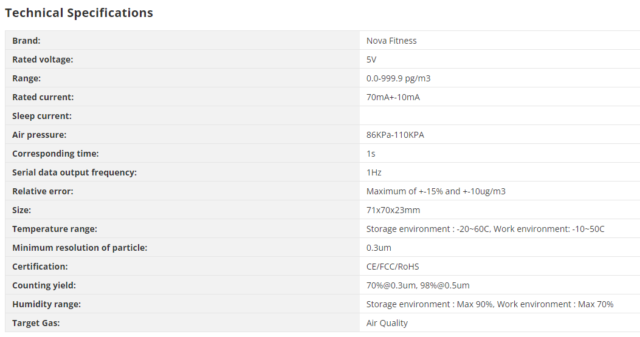
Kindly refer to the below image for the sensor’s specifications.
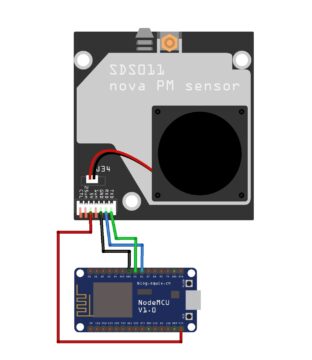
Circuit Diagram: Interfacing SDS011 with ESP8266
This illustration showcases the connectivity between the SDS011 and the ESP8266 module.
Source code: Interfacing SDS011 with ESP8266.
#include <SoftwareSerial.h>

// SDS011 software serial pins
#define SDS_RX D5
#define SDS_TX D6
SoftwareSerial sds(SDS_RX, SDS_TX);

void setup() {
  // Initialize Serial communication with the computer
  Serial.begin(115200);
  delay(100);  // Short delay after initializing Serial
  Serial.println("Initializing SDS011 Air Quality Monitor...");

  // Initialize SoftwareSerial communication with SDS011
  sds.begin(9600);
}

void loop() {
  // Look for the starting byte of the SDS011 data frame
  while (sds.available() && sds.read() != 0xAA) { }

  if (sds.available()) {
    Serial.println("Data available from SDS011...");
  }

  // Once we have the starting byte, attempt to read the next 9 bytes
  byte buffer[10];
  buffer[0] = 0xAA;  // The starting byte we already found
  if (sds.available() >= 9) {
    sds.readBytes(&buffer[1], 9);

    // Check if the last byte is the correct ending byte
    if (buffer[9] == 0xAB) {
      int pm25int = (buffer[3] << 8) | buffer[2];
      int pm10int = (buffer[5] << 8) | buffer[4];
      float pm2_5 = pm25int / 10.0;
      float pm10 = pm10int / 10.0;

      // Print the values
      Serial.print("PM2.5: ");
      Serial.print(pm2_5, 2);  // 2 decimal places
      Serial.print(" µg/m³   ");
      Serial.print("PM10: ");
      Serial.print(pm10, 2);  // 2 decimal places
      Serial.println(" µg/m³   ");
    } else {
      Serial.println("Invalid ending byte from SDS011.");
    }
  } else {
    Serial.println("Not enough data from SDS011.");
  }
  delay(1000);  // Delay before the next read to avoid flooding the serial
}
Code Detailed Explanation:
Here’s a detailed explanation of the provided Arduino code for interfacing the SDS011 Air Quality Sensor with the ESP8266:
#include <SoftwareSerial.h>

// SDS011 software serial pins
#define SDS_RX D5
#define SDS_TX D6
SoftwareSerial sds(SDS_RX, SDS_TX);
This section includes the necessary library (SoftwareSerial) and defines the pins for the SDS011 sensor’s software serial communication. The SoftwareSerial library enables the ESP8266 to communicate with devices using serial communication on pins other than the hardware serial pins.
void setup() {
  // Initialize Serial communication with the computer
  Serial.begin(115200);
  delay(100);  // Short delay after initializing Serial
  Serial.println("Initializing SDS011 Air Quality Monitor...");

  // Initialize SoftwareSerial communication with SDS011
  sds.begin(9600);
}
In the setup() function, the code initializes the communication channels. The hardware serial (Serial) is initialized for communication with the computer at a baud rate of 115200. A short delay is added for stability. The SoftwareSerial instance sds is then initialized with the specified RX (Receive) and TX (Transmit) pins at a baud rate of 9600, matching the communication speed of the SDS011 sensor.
void loop() {
  // Look for the starting byte of the SDS011 data frame
  while (sds.available() && sds.read() != 0xAA) { }

  if (sds.available()) {
    Serial.println("Data available from SDS011...");
  }
The loop() function continuously runs in a loop. It first searches for the starting byte (0xAA) of the SDS011 data frame. The while loop waits until there is data available (sds.available()) and reads bytes until it finds the starting byte.
// Once we have the starting byte, attempt to read the next 9 bytes
byte buffer[10];
buffer[0] = 0xAA;  // The starting byte we already found
if (sds.available() >= 9) {
  sds.readBytes(&buffer[1], 9);

  // Check if the last byte is the correct ending byte
  if (buffer[9] == 0xAB) {
    int pm25int = (buffer[3] << 8) | buffer[2];
    int pm10int = (buffer[5] << 8) | buffer[4];
    float pm2_5 = pm25int / 10.0;
    float pm10 = pm10int / 10.0;
Once the starting byte is found, the code attempts to read the next 9 bytes into an array called buffer. It checks if the last byte is the correct ending byte (0xAB) to ensure the integrity of the data frame.
      // Print the values
      Serial.print("PM2.5: ");
      Serial.print(pm2_5, 2);  // 2 decimal places
      Serial.print(" µg/m³   ");
      Serial.print("PM10: ");
      Serial.print(pm10, 2);  // 2 decimal places
      Serial.println(" µg/m³   ");
    } else {
      Serial.println("Invalid ending byte from SDS011.");
    }
  } else {
    Serial.println("Not enough data from SDS011.");
  }
  delay(1000);  // Delay before the next read to avoid flooding the serial
}
If the ending byte is correct, the code extracts the particulate matter (PM) concentration values from the received data and prints them to the Serial Monitor. It calculates and prints the PM2.5 and PM10 values in micrograms per cubic meter (µg/m³). If the ending byte is incorrect or there is not enough data, appropriate error messages are printed. Finally, there’s a delay of 1000 milliseconds (1 second) before the next iteration to avoid flooding the serial communication.
Uploading code to ESP8266:
Connect the ESP8266 module with a laptop. Check the uploading configuration Board: NodeMCU 1.0(ESP12E module), Uploading speed, and select the right port. If everything okay, upload the code.
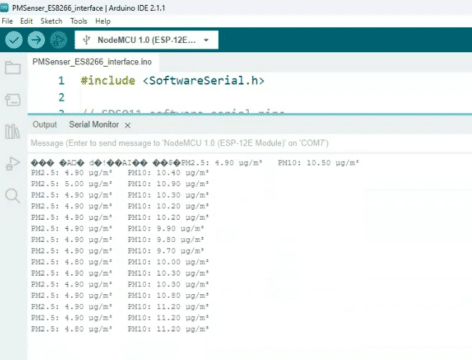
After successful uploading open the serial monitor, and then restart the ESP8266 module.
Now, you can see the real-time PM2.5 and PM10 readings on the Serial monitor. At start you will see the data which is not stable, you have to leave the setup for atleast 10 to 15minutes to settle the environment. After 15minutes of waiting now I can see the stable values.
Rightnow, The PM2.5 and PM10 values in my lab are as follows, and I think I am currently living in the good Environment,
 That’s all for today! Now you have a fully operational air quality monitor using SDS011 and ESP8266.
See you soon on the next interesting project bubye…