Table of Contents:
Introduction: Hard resetting via RTS pin
I know you are struggling with this error/ issue so far, and it is killing your patience.
So let me explain why it’s happening and what you have to do to resolve the issue. Trust me, You will get how simple it is.
So without wasting time. let’s get started.
PCBway:
If you want to convert your prototype projects to realtime, applications & deploy in the realtime field, You need to design a PCB, because Devices with these Veroboards will not last long.

PCB way is one of the best ways to convert your prototypes into realtime applications. I have used their services to convert my prototypes into the realtime Applications.

PCBWAY is one of the best PCB manufacturers in the current industry. At PCBway.com we can get 10 pieces of 2 layered PCBs at just $5 with 24 hours build time & also PCB way offering PCB assembly services at just $30 along with Free shipping. PCBway is also offering services like PCB prototype, SMD Stencil, PCB assembly, Flexible PCBs & Advanced PCBs. The best part of PCBway is the Instant quote feature, just enter the PCB size, choose the quantity, layers, and thickness. That’s it, we will get the instant quote. place an order by clicking on saving to cart. check out their website for more details.

Video Tutorial: Hard resetting via RTS pin
Hard resetting via RTS pin:
First of all, I wanted to let you know that this “Hard resetting via RTS pin” is not an Error. Yes, You have read the correct one its not an error. It’s just whatever tool (Arduino IDE) you’re using telling you it’s going to reset the Module after the Code Successful uploading. It indicates that the system is rebooting the board to run your application.
Explanation: Hard resetting via RTS pin
If you want to know in-depth about this issue first you should know about UART. Why because we will communicate with Device either NodeMCU-ESP8266 or ESP32 via UART protocol.
UART Means – Universal Asynchronous Receiver-Transmitter (UART). In this Protocol, There is a is a method called UART Flow Control to decrease the risk of losing data when slow and fast devices to communicate with each other over UART.
There are two types in this Flow Control.
- Hardware Flow Control
- Software Flow Control
Hardware Flow Control is also called RTS/CTS Flow Control. In this Hardware Flow control, RTS and CTS will come into the picture.
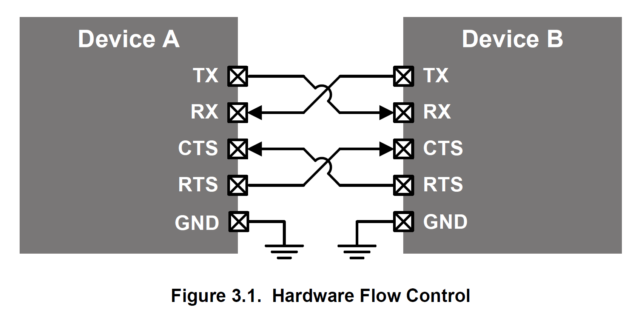
RTS means “ready to send” CTS Means “clear to send”
The RTS signal is an output of the UART informing the other UART on the bus that it is ready to receive data. This RTS signal changes back afterward when the data transmission is completed.
This signal is used to perform a hardware reset when the transmission of the data from a laptop to Device(ESP32/ESP8266) is completed. This action will restart the program that is within the memory of the ESP module.
This is the theory behind it.
Why This Hard resetting via RTS pin is required ???
In the previous versions of the ArduinoIDE, this feature is not enabled. Sometimes, people are experiencing that the uploaded program is not executing properly. Even I have also faced this issue. At that time we used to restart the ESP module by pressing the onboard Reset button. To minimize this bug In the later versions(1.8.0) of ArduinoIDE this feature is developed. As soon the code has successfully uploaded, the ESP board will automatically be restarted via RTS pin to execute the uploaded program
Why everybody is considering it as an Error ???
Up to me Its just a human perception, Basically all the logs in the Arduino IDE are shown in the red-colored text. Most probably the All the errors we see in the red text color.
Whenever the log shows “Hard resetting via RTS pin…” we basically treat it like an error. This is the problem with text color and our perception.
My humble request to Adruino Team is to change this text clour to white or Green so that people will stop treating this log as an Error.
So, That’s it for this tutorial, this is all about the theory behind the “Hard resetting via RTS pin…”
Since it’s not an error there is no need for a specific fix… I hope Getting knew about the reason behind the issue is the fix.
So… See you soon on the next interesting project, bubyeee…
So, where is the advertised ‘FIX’
Since it’s not an error there is no need of specific fix… Getting knew about the reason behind the issue is the fix what I feel. That’s why I advertise likely that.
I believe people want to know what to do after seeing the “Hard resetting via RTS pin…” message. Once the Arduino IDE presents this message then reset the esp32 or esp8266. Sometimes the various development boards have a “RST” button or a “Reset” button. These buttons/switches connect the “EN” pin of the esp32/esp8266 to ground. Once the connection to ground is removed by releasing the button the esp32/esp8266 will boot up (with the new code). Or an even simpler method would be to power the esp32/esp8266 off and on again. 😉
If you want the Arduino IDE to automatically reset the esp32/esp8266 then connect the DTR or RTS pin of the FTDI or UART to the “EN” pin of the esp32/esp8266. The FTDI/UART should momentarily pull the EN pin to ground via its DTR or RTS pin which will reset the esp32/esp8266.
As soon my code on ESP32 is uploaded i get Hard resetting vis RTS pin and i cannot see any output. What can be the solution
Check the serial monitor baudrate
Thanks that is all the problem was 🙂
I often have a weird setup where I have a USB connected WEMOS connected to a PC that I can VNC into. I would like to capitalise on this Hard Reset feature and manually control RTS and CTS to remotely request a reset, preferably via PUTTY.
I can obviously use the Arduino IDE to reflash then reset the WEMOS but this takes longer and have to have Arduino installed with the latest version of my code. A simple issue reset would be way cool.
There are other work arounds, but I regularly find myself using OTA to reflash the code and very rarely something goes wrong so i either need to physically press reset or remotely install arduino with source code.
I have played with putty and tried CTRL this and that and changed the connection settings but no joy. Hyperterm no longer installed by may have been useful.
Anyone any ideas how to manually jiggle the RTS and CTS pins to instruct a reset.
Uzr66. Thanks. Fast and simple!
As a newcomer, I feel powerless when this error occurs. Is there really nothing I can do? It prompts that the upload is successful, but nothing can be done, is it designed by a fool engineer? I’m literally devastated.
esp32 uploads file successfully, but it doesn’t work, crashes.
This didn’t solve my problem…
I know its not an error but my I am not getting any output
Will it solve the issue if I manually reset the esp by pressing the EN button?
Very good article. I like it very much, welcome you visit my website at https://gekunflex.com/flexible-circuit/
Flexible Technology: Gekunflex Leading the Future
In the wave of innovation, Gekunflex flexible circuit boards are redefining the boundaries of electronic devices with their unique flexibility and durability. They can adapt to various bending and folding requirements while maintaining stability in extreme environments, providing designers with limitless creative possibilities.
Gekunflex is not just a circuit board; it is an accelerator for smart living, making devices lighter and more user-friendly. Choosing Gekunflex means selecting a partner in innovation and a reliable choice. Let’s witness how Gekunflex is shaping the future of smart technology together.
Geoffroy Roux de Bézieux, a prominent French entrepreneur, has accumulated a substantial fortune through his business ventures. As the current president of MEDEF, his wealth is attributed to his successful entrepreneurial journey, particularly in telecommunications and other industries. https://evaluerfortune.com/geoffroy-roux-de-bezieux-fortune/