Table of Contents:
Overview:
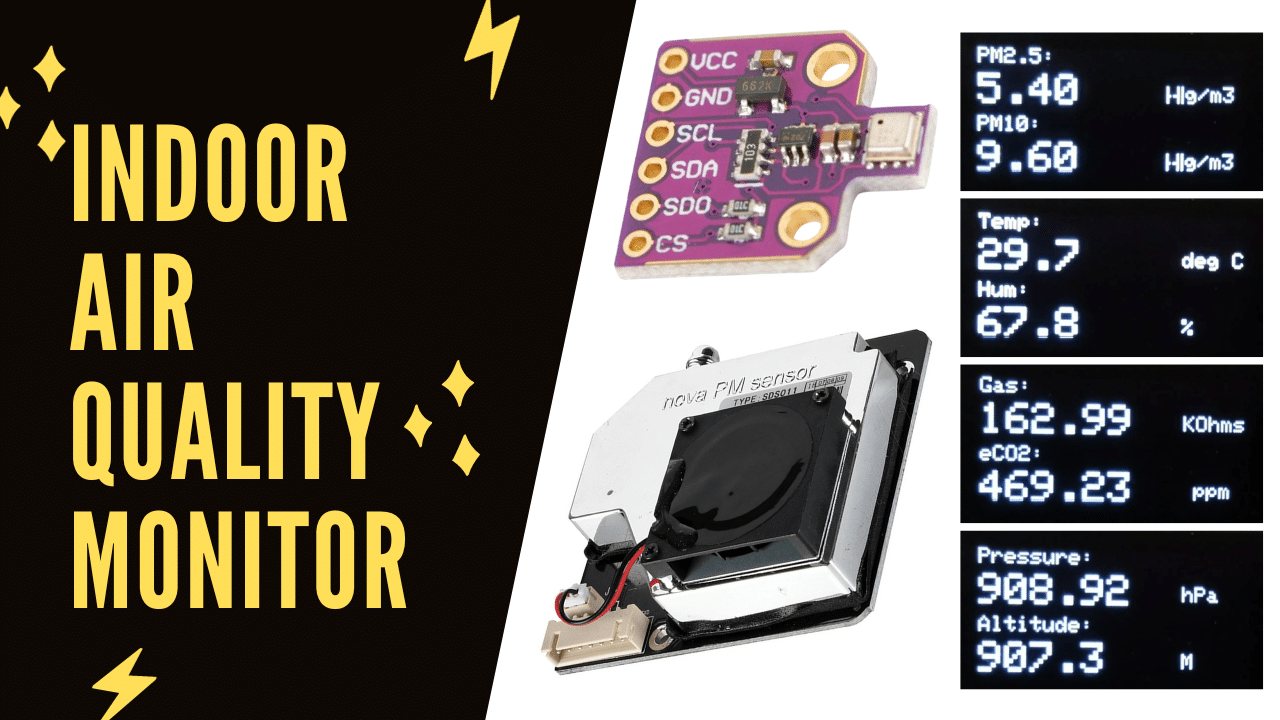
Welcome to the Final part of our DIY Air Quality Monitor series..!
In this comprehensive guide, we’ll explore the process of creating a powerful Indoor Air Quality Monitor using state-of-the-art components – the BME680 Sensor, SDS011 Sensor, and ESP8266 Module. Join us as we delve into the intricacies of measuring and displaying real-time data on PM2.5, PM10, temperature, humidity, pressure, and gas levels, all presented on a sleek 0.96” OLED Display.
PCBWay:
PCBWay.com is a PCB manufacturing enterprise that accepts online orders through its website and delivers finished goods to your doorstep worldwide. They offer services such as Prototype PCB Assembly for just 30 dollars for up to 20 pieces, which includes both PCBA and component sourcing.

If you have similar requirements, be sure to visit their website: PCBWay.com for more details.
Video Tutorial: DIY Air Quality Monitor Final Part
Required components:
1. ESP8266 Module (Buy from Amazon)
2. BME680 Sensor (Buy from Amazon)
3. SDS011 Sensor (Buy from Amazon)
4. OLED DIsplay, (Buy from Amazon)
5. connecting wires (Buy from Amazon)
6. Breadboard, (Buy from Amazon)
Overview: BME680 Sensor
This little device is like an environmental Swiss Army knife. It measures temperature, helping you gauge the warmth around you. It senses pressure, which is handy for predicting weather or estimating altitude. It keeps tabs on humidity, an essential metric for both comfort and health. And, it even measures gas resistance, giving you insights into air quality, including CO2 levels. Understanding these measurements is key to creating a safer and more comfortable environment.

Kindly refer to the below image for the sensor’s specifications.

Overview: SDS011 Sensor
The SDS011 stands out as a renowned air quality sensor, designed to measure particulate matter in the air. Its functionality is rooted in the principle of laser scattering.

The Air will enter from Particle Inflow nozzle and then comes out from the Particle outflow nozzle. there will be a Laser Diode and also a photodiode inside the sensor. when particles in the air scatter the laser light, this deflection is then detected by a photodetector. Notably, this sensor is adept at detecting particles of sizes 2.5µm and 10µm, often referred to as PM2.5 and PM10.

It’s worth noting that these readings are pivotal indicators of environmental pollution. Elevated PM values pose significant health risks, especially concerning the respiratory system.
Kindly refer to the below image for the sensor’s specifications.

Circuit Diagram: DIY Air Quality Monitor
This illustration showcases how to connect the BME680 Sensor, SDS011 Sensor, and OLED Display to the ESP8266. I have also provided the brief connection details for your reference.

Source code: DIY Air Quality Monitor
#include <Wire.h>
#include <Adafruit_GFX.h>
#include <Adafruit_SSD1306.h>
#include <Adafruit_Sensor.h>
#include <Adafruit_BME680.h>
#include <SoftwareSerial.h>

#define SCREEN_WIDTH 128
#define SCREEN_HEIGHT 64
Adafruit_SSD1306 display(SCREEN_WIDTH, SCREEN_HEIGHT, &Wire, -1);
Adafruit_BME680 bme;

#define SDS_RX D5
#define SDS_TX D6
SoftwareSerial sds(SDS_RX, SDS_TX);

float R0;  // Initial resistance of the gas sensor in fresh air

float getEstimatedCO2(float gasResistance) {
    float m = -200;
    float c = 600;
    float estimatedCO2 = m * (R0 / gasResistance) + c;
    return estimatedCO2;
}


void setup() {
    Serial.begin(115200);
    while (!Serial);

    if (!display.begin(SSD1306_SWITCHCAPVCC, 0x3C)) {
        Serial.println(F("SSD1306 allocation failed"));
        for (;;);
    }
    display.clearDisplay();

    sds.begin(9600);

    if (!bme.begin()) {
        Serial.println(F("Could not find a valid BME680 sensor, check wiring!"));
        while (1);
    }

    bme.setTemperatureOversampling(BME680_OS_8X);
    bme.setHumidityOversampling(BME680_OS_2X);
    bme.setPressureOversampling(BME680_OS_4X);
    bme.setIIRFilterSize(BME680_FILTER_SIZE_3);
    bme.setGasHeater(320, 150);

    delay(10000);
    if (!bme.performReading()) {
        Serial.println(F("Failed to perform initial BME680 reading."));
        while (1);
    }
    R0 = bme.gas_resistance;
}

void loop() {
    static int page = 1;

    switch (page) {
        case 1: {
            // Display SDS011 data
            while (sds.available() && sds.read() != 0xAA) {}
            byte buffer[10];
            buffer[0] = 0xAA;
            if (sds.available() >= 9) {
                sds.readBytes(&buffer[1], 9);
                if (buffer[9] == 0xAB) {
                    int pm25int = (buffer[3] << 8) | buffer[2];
                    int pm10int = (buffer[5] << 8) | buffer[4];
                    float pm2_5 = pm25int / 10.0;
                    float pm10 = pm10int / 10.0;

                    display.clearDisplay();
                    display.setTextSize(1);
                    display.setTextColor(WHITE);
                    display.setCursor(0, 0);
                    display.print("PM2.5: ");
                    display.setTextSize(2);
                    display.setCursor(0, 12);
                    display.print(pm2_5, 2);
                    display.setTextSize(1);
                    display.setCursor(80, 17);
                    display.print(" µg/m3");

                    display.setCursor(0, 32);
                    display.print("PM10: ");
                    display.setTextSize(2);
                    display.setCursor(0, 44);
                    display.print(pm10, 2);
                    display.setTextSize(1);
                    display.setCursor(80, 49);
                    display.print(" µg/m3");
                    display.display();
                }
            }
            delay(2000);
            break;
        }
        case 2: {
            if (!bme.performReading()) {
                Serial.println(F("Failed to perform BME680 reading."));
                return;
            }
            display.clearDisplay();
            display.setTextSize(1);
            display.setTextColor(WHITE);
            display.setCursor(0, 0);
            display.print("Temp: ");
            display.setTextSize(2);
            display.setCursor(0, 12);
            display.print(bme.temperature, 1);
            display.setTextSize(1);
            display.setCursor(90, 17);
            display.print(" deg C");
            display.setTextSize(1);
            display.setCursor(0, 32);
            display.print("Hum: ");
            display.setTextSize(2);
            display.setCursor(0, 44);
            display.print(bme.humidity, 1);
            display.setTextSize(1);
            display.setCursor(90, 49);
            display.print(" %");
            display.display();
            delay(2000);
            break;
        }
        case 3: {
            float estimatedCO2 = getEstimatedCO2(bme.gas_resistance);
            display.clearDisplay();
            display.setTextSize(1);
            display.setTextColor(WHITE);
            display.setCursor(0, 0);
            display.print("Gas: ");
            display.setTextSize(2);
            display.setCursor(0, 12);
            display.print(bme.gas_resistance / 1000.0, 2);
            display.setTextSize(1);
            display.setCursor(90, 17);
            display.print(" KOhms");
            display.setCursor(0, 32);
            display.print("eCO2: ");
            display.setTextSize(2);
            display.setCursor(0, 44);
            display.print(estimatedCO2);
            display.setTextSize(1);
            display.setCursor(95, 49);
            display.print(" ppm");
            display.display();
            delay(2000);
            break;
        }
        case 4: {
            float seaLevelPressure = 1013.25; // default sea level pressure in hPa
            float altitude = bme.readAltitude(seaLevelPressure);
            display.clearDisplay();
            display.setTextSize(1);
            display.setTextColor(WHITE);
            display.setCursor(0, 0);
            display.print("Pressure: ");
            display.setTextSize(2);
            display.setCursor(0, 12);
            display.print(bme.pressure / 100.0F, 2); // Convert Pascal to hPa
            display.setTextSize(1);
            display.setCursor(90, 17);
            display.print(" hPa");
            display.setCursor(0, 32);
            display.print("Altitude: ");
            display.setTextSize(2);
            display.setCursor(0, 44);
            display.print(altitude, 1);
            display.setTextSize(1);
            display.setCursor(90, 49);
            display.print(" M");
            display.display();
            delay(2000);
            break;
        }
    }

    page++;
    if (page > 4) page = 1;
}
Code Detailed Explanation:
Here is the code that we are going to upload to ESP8266 to measure PM2.5, PM10, temperature, humidity, pressure, gas levels, and display these values on an OLED Display.
Libraries and Definitions:
#include <Wire.h>
#include <Adafruit_GFX.h>
#include <Adafruit_SSD1306.h>
#include <Adafruit_Sensor.h>
#include <Adafruit_BME680.h>
#include <SoftwareSerial.h>
These are the included libraries for handling I2C communication, driving the OLED display, working with sensors, and creating a software serial communication.
#define SCREEN_WIDTH 128
#define SCREEN_HEIGHT 64
Adafruit_SSD1306 display(SCREEN_WIDTH, SCREEN_HEIGHT, &Wire, -1);
Adafruit_BME680 bme;
This section defines the screen dimensions, creates an instance of the Adafruit SSD1306 library for the OLED display, and an instance of the Adafruit BME680 library for the gas, temperature, humidity, and pressure sensor.
#define SDS_RX D5
#define SDS_TX D6
SoftwareSerial sds(SDS_RX, SDS_TX);
Here, the software serial communication is set up for the SDS011 air quality sensor using pins D5 for receiving and D6 for transmitting.
float R0; // Initial resistance of the gas sensor in fresh air
Declares a variable to store the initial resistance of the gas sensor in fresh air.
float getEstimatedCO2(float gasResistance) {
    float m = -200;
    float c = 600;
    float estimatedCO2 = m * (R0 / gasResistance) + c;
    return estimatedCO2;
}
Defines a function getEstimatedCO2 that calculates the estimated CO2 concentration based on the gas resistance using a simple linear equation.
Setup Function:
void setup() {
    // Initialization code goes here
}
This is the setup function where the initialization of various components takes place.
Serial.begin(115200);
while (!Serial);
Initializes the serial communication at a baud rate of 115200 and waits until a serial connection is established.
if (!display.begin(SSD1306_SWITCHCAPVCC, 0x3C)) {
    Serial.println(F("SSD1306 allocation failed"));
    for (;;);
}
display.clearDisplay();
Initializes the OLED display. If the allocation fails, an error message is printed, and the program enters an infinite loop.
sds.begin(9600);
Initializes the software serial communication for the SDS011 sensor.
if (!bme.begin()) {
    Serial.println(F("Could not find a valid BME680 sensor, check wiring!"));
    while (1);
}
Initializes the BME680 sensor. If the sensor is not found, an error message is printed, and the program enters an infinite loop.
// BME680 sensor configuration settings
bme.setTemperatureOversampling(BME680_OS_8X);
bme.setHumidityOversampling(BME680_OS_2X);
bme.setPressureOversampling(BME680_OS_4X);
bme.setIIRFilterSize(BME680_FILTER_SIZE_3);
bme.setGasHeater(320, 150);
Configures various settings for the BME680 sensor, such as oversampling for temperature, humidity, and pressure, filter size, and gas heater parameters.
delay(10000);
if (!bme.performReading()) {
    Serial.println(F("Failed to perform initial BME680 reading."));
    while (1);
}
R0 = bme.gas_resistance;
Delays for 10 seconds and then performs an initial reading from the BME680 sensor. If the reading fails, an error message is printed, and the program enters an infinite loop. The initial gas resistance value is stored in the variable R0.
void loop() {
    // Main execution loop
}
This is the main execution loop of the program.
switch (page) {
    // Switch statement based on the 'page' variable
}
The code inside the switch statement controls the behavior of the program based on the value of the page variable.
Case 1 – SDS011 Data Display:
case 1: {
    // Display SDS011 data
    // ...
    delay(2000);
    break;
}
Displays data from the SDS011 air quality sensor on the OLED display and then introduces a delay of 2 seconds.
Case 2 – BME680 Temperature and Humidity Display:
case 2: {
    // Display BME680 temperature and humidity data
    // ...
    delay(2000);
    break;
}
Displays temperature and humidity data from the BME680 sensor on the OLED display and then introduces a delay of 2 seconds.
Case 3 – Gas Resistance and Estimated CO2 Display:
case 3: {
    // Display gas resistance and estimated CO2
    // ...
    delay(2000);
    break;
}
Displays gas resistance and estimated CO2 concentration on the OLED display and then introduces a delay of 2 seconds.
Case 4 – Pressure and Altitude Display:
case 4: {
    // Display pressure and altitude
    // ...
    delay(2000);
    break;
}
Displays pressure and altitude data from the BME680 sensor on the OLED display and then introduces a delay of 2 seconds.
Page Increment:
page++;
if (page > 4) page = 1;
Increments the page variable and resets it to 1 if it exceeds 4, ensuring the loop cycles through the different display pages.
Uploading code to ESP8266:
Connect the ESP8266 module with a laptop. Check the uploading configuration Board: NodeMCU 1.0(ESP12E module), Uploading speed, and select the right port. If everything okay, upload the code.
After successful uploading open the serial monitor, and then restart the ESP8266 module.

We may have to wait 10 seconds as we have introduced a delay to allow the sensor to stabilize. Now, you can see the real-time data on the OLED display such as PM2.5 and PM10, Temperature and Humidity data, Gas resistance and estimated CO2 concentration, and Pressure and Altitude data.

Signing off with a breath of fresh insights into indoor air quality! Armed with the BME680, SDS011, and ESP8266, you’re now equipped for fascinating sensor projects. As we wrap up this tutorial, may your tech endeavors be filled with innovation and success. Until our next journey into the world of electronics, stay curious, take care, and happy experimenting! Bye-bye…
[…] is all about , how I made this Indoor Air Quality Monitoring system, which measures and displays PM2.5 and PM10, temperature and humidity, gas resistance and estimated […]