Table of Contents:
Overview:
Welcome to the second installment of our DIY Air Pollution Monitor series..! In this post, we delve into the integration of the BME680 sensor with the ESP8266 microcontroller. The BME680, renowned for its ability to measure temperature, humidity, pressure, and air quality, becomes the focal point of our project as we harness its capabilities to create a comprehensive air quality monitoring system.
Join us on this journey as we explore the intricate process of merging sensor data with the ESP8266, a versatile and widely-used microcontroller known for its compatibility with various sensors and seamless integration with Wi-Fi networks. This integration not only allows us to gather real-time environmental data but also opens up avenues for remote monitoring and data visualization.
Throughout this post, we will guide you step by step, from the initial setup of the BME680 sensor to the coding intricacies of the ESP8266, enabling you to replicate this air quality monitoring system in your own DIY projects. Whether you are an electronics enthusiast, a programmer, or someone passionate about environmental monitoring, this tutorial offers a hands-on experience in building a sophisticated yet accessible solution for tracking and understanding air quality in your surroundings. Let’s embark on this DIY adventure together and empower ourselves with the tools to monitor and improve the air we breathe. Let’s embark on this technological adventure together!
PCBWay:
PCBWay.com is an online PCB manufacturing enterprise that offers high-quality PCBs for just $5. They provide all the services you need, to create hardware for your IoT or embedded devices, including PCB prototyping, PCB assembly, manufacturing of FPC/Rigid Flex PCBs, and offering CNC and 3D printing services.

If you have similar requirements, be sure to visit their website: PCBWay.com for more details.
Video Tutorial: How to Interface BME680 with ESP8266?
Required components:
1. ESP8266 Module (Buy from Amazon)
2. BME680 Sensor (Buy from Amazon)
3. connecting wires (Buy from Amazon)
4. Breadboard, (Buy from Amazon)
Overview: BME680 Sensor
This little device is like an environmental Swiss Army knife. It measures temperature, helping you gauge the warmth around you. It senses pressure, which is handy for predicting weather or estimating altitude. It keeps tabs on humidity, an essential metric for both comfort and health. And, it even measures gas resistance, giving you insights into air quality, including CO2 levels. Understanding these measurements is key to creating a safer and more comfortable environment.
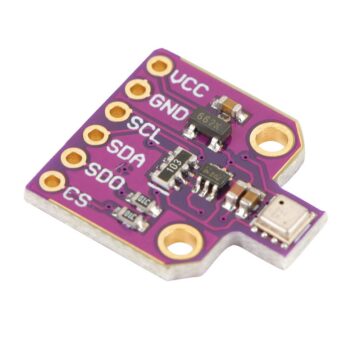
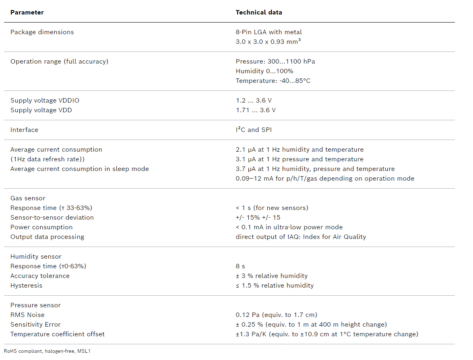
Kindly refer to the below image for the sensor’s specifications.
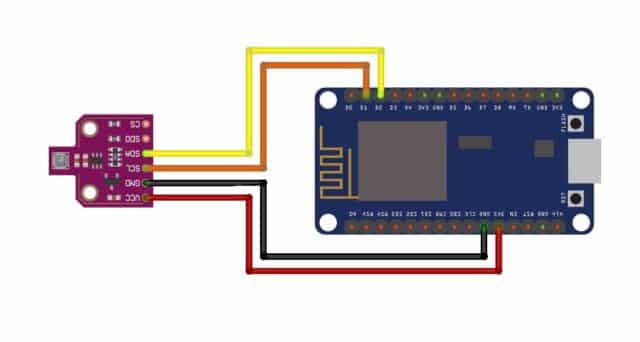
Circuit Diagram: Interfacing BME680 with ESP8266
This illustration showcases the connectivity between the BME680 and the ESP8266 module.
Source code: Interfacing BME680 with ESP8266
#include <Wire.h>
#include <SPI.h>
#include <Adafruit_Sensor.h>
#include "Adafruit_BME680.h"

#define SEALEVELPRESSURE_HPA (1013.25)

Adafruit_BME680 bme; // I2C

float R0;  // Baseline resistance for VOCs in a fresh-air environment

void setup() {
  Serial.begin(115200);
  while (!Serial);
  Serial.println(F("BME680 async test"));

  if (!bme.begin()) {
    Serial.println(F("Could not find a valid BME680 sensor, check wiring!"));
    while (1);
  }

  // Set up oversampling and filter initialization
  bme.setTemperatureOversampling(BME680_OS_8X);
  bme.setHumidityOversampling(BME680_OS_2X);
  bme.setPressureOversampling(BME680_OS_4X);
  bme.setIIRFilterSize(BME680_FILTER_SIZE_3);
  bme.setGasHeater(320, 150); // 320°C for 150 ms

  delay(20000); // Give the sensor 20 seconds to stabilize

  bme.beginReading();
  delay(50);
  if (bme.endReading()) {
    R0 = bme.gas_resistance;
  } else {
    Serial.println(F("Failed to read initial gas resistance."));
    while(1);
  }

  // Ensure R0 is a valid value
  if (R0 <= 0) {
      Serial.println(F("Invalid baseline resistance! Please restart the sensor in a fresh-air environment."));
      while (1);
  }

  Serial.print(F("Baseline Resistance: "));
  Serial.println(R0);
}


float estimateCO2(float Rs) {
    float a = 33.33;
    float b = -150.00;
    float c = 516.67;
    float ratio = Rs / R0;
    return a * ratio * ratio + b * ratio + c;
}


void loop() {
  unsigned long endTime = bme.beginReading();
  if (endTime == 0) {
    Serial.println(F("Failed to begin reading :("));
    return;
  }

  delay(50); // This represents parallel work.

  if (!bme.endReading()) {
    Serial.println(F("Failed to complete reading :("));
    return;
  }

  Serial.print(F("Temperature = "));
  Serial.print(bme.temperature);
  Serial.println(F(" *C"));

  Serial.print(F("Pressure = "));
  Serial.print(bme.pressure / 100.0);
  Serial.println(F(" hPa"));

  Serial.print(F("Humidity = "));
  Serial.print(bme.humidity);
  Serial.println(F(" %"));

  Serial.print(F("Gas = "));
  Serial.print(bme.gas_resistance / 1000.0);
  Serial.println(F(" KOhms"));

  float estimatedCO2ppm = estimateCO2(bme.gas_resistance);
  Serial.print(F("Estimated CO2 = "));
  Serial.print(estimatedCO2ppm);
  Serial.println(F(" ppm"));

  Serial.print(F("Approx. Altitude = "));
  Serial.print(bme.readAltitude(SEALEVELPRESSURE_HPA));
  Serial.println(F(" m"));

  Serial.println();
  delay(2000);
}
Code Detailed Explanation:
Let’s break down the provided Arduino code for integrating the BME680 sensor, estimating CO2 levels, and reading environmental data.
#include <Wire.h>
#include <SPI.h>
#include <Adafruit_Sensor.h>
#include "Adafruit_BME680.h"

#define SEALEVELPRESSURE_HPA (1013.25)

Adafruit_BME680 bme; // I2C

float R0;  // Baseline resistance for VOCs in a fresh-air environment
- Header and Library Inclusions:
#include <Wire.h>,#include <SPI.h>, and#include <Adafruit_Sensor.h>are including necessary libraries for communication and sensor support."Adafruit_BME680.h"includes the library for the BME680 sensor.
- Global Variables:
#define SEALEVELPRESSURE_HPA (1013.25): Defines a constant for sea level pressure in hectopascals.Adafruit_BME680 bme;: Creates an object of the Adafruit_BME680 class named ‘bme’ for interacting with the BME680 sensor.float R0;: Declares a global variable to store the baseline resistance for VOCs in a fresh-air environment
void setup() {
  Serial.begin(115200);
  while (!Serial);
  Serial.println(F("BME680 async test"));

  if (!bme.begin()) {
    Serial.println(F("Could not find a valid BME680 sensor, check wiring!"));
    while (1);
  }
Setup Function:
Serial.begin(115200);: Initializes the serial communication at a baud rate of 115200.while (!Serial);: Waits until a serial connection is established.Serial.println(F("BME680 async test"));: Prints a message to the serial monitor.if (!bme.begin()) { ... }: Checks if the BME680 sensor is properly connected. If not, it prints an error message and enters an infinite loop.
  // Set up oversampling and filter initialization
  bme.setTemperatureOversampling(BME680_OS_8X);
  bme.setHumidityOversampling(BME680_OS_2X);
  bme.setPressureOversampling(BME680_OS_4X);
  bme.setIIRFilterSize(BME680_FILTER_SIZE_3);
  bme.setGasHeater(320, 150); // 320°C for 150 ms

  delay(20000); // Give the sensor 20 seconds to stabilize

  bme.beginReading();
  delay(50);
  if (bme.endReading()) {
    R0 = bme.gas_resistance;
  } else {
    Serial.println(F("Failed to read initial gas resistance."));
    while(1);
  }

  // Ensure R0 is a valid value
  if (R0 <= 0) {
      Serial.println(F("Invalid baseline resistance! Please restart the sensor in a fresh-air environment."));
      while (1);
  }

  Serial.print(F("Baseline Resistance: "));
  Serial.println(R0);
}
Sensor Initialization:
- Configures oversampling and filter settings for temperature, humidity, and pressure readings.
- Sets the gas heater parameters.
- Delays for 20 seconds to allow the sensor to stabilize.
- Reads the initial gas resistance value (R0) after stabilization.
- Checks the validity of the baseline resistance and prints an error if it’s invalid.
float estimateCO2(float Rs) {
    float a = 33.33;
    float b = -150.00;
    float c = 516.67;
    float ratio = Rs / R0;
    return a * ratio * ratio + b * ratio + c;
}
CO2 Estimation Function:
- Defines a function
estimateCO2that takes the sensor resistance (Rs) as input and calculates the estimated CO2 concentration using a quadratic formula.
void loop() {
  unsigned long endTime = bme.beginReading();
  if (endTime == 0) {
    Serial.println(F("Failed to begin reading :("));
    return;
  }

  delay(50); // This represents parallel work.

  if (!bme.endReading()) {
    Serial.println(F("Failed to complete reading :("));
    return;
  }
Main Loop:
- Initiates a sensor reading and records the end time.
- Checks for errors during the start and end of the reading process.
  Serial.print(F("Temperature = "));
  Serial.print(bme.temperature);
  Serial.println(F(" *C"));

  Serial.print(F("Pressure = "));
  Serial.print(bme.pressure / 100.0);
  Serial.println(F(" hPa"));

  Serial.print(F("Humidity = "));
  Serial.print(bme.humidity);
  Serial.println(F(" %"));

  Serial.print(F("Gas = "));
  Serial.print(bme.gas_resistance / 1000.0);
  Serial.println(F(" KOhms"));

  float estimatedCO2ppm = estimateCO2(bme.gas_resistance);
  Serial.print(F("Estimated CO2 = "));
  Serial.print(estimatedCO2ppm);
  Serial.println(F(" ppm"));

  Serial.print(F("Approx. Altitude = "));
  Serial.print(bme.readAltitude(SEALEVELPRESSURE_HPA));
  Serial.println(F(" m"));

  Serial.println();
  delay(2000);
}
Printing Sensor Data:
- Prints temperature, pressure, humidity, gas resistance, estimated CO2 concentration, and approximate altitude to the serial monitor.
- Delays for 2 seconds before the next iteration of the loop.
Uploading code to ESP8266:
Connect the ESP8266 module with a laptop. Check the uploading configuration Board: NodeMCU 1.0(ESP12E module), Uploading speed, and select the right port. If everything okay, upload the code.
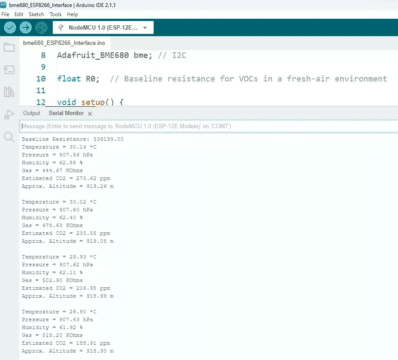
After successful uploading open the serial monitor, and then restart the ESP8266 module.
You may have to wait 20 Seconds as we have introduced a delay to allow the sensor to stabilize. Then, you’ll get real-time data of temperature, pressure, humidity, gas resistance, and estimated CO2 levels. Be patient for the first 15 minutes as the readings are not stable or inaccurate as the sensor will take some time to provide stable readings.
To sum it up, I hope this tutorial has added a touch of environmental intelligence to your tech toolkit. With the BME680 and ESP8266, you’re all set to embark on exciting sensor projects. Until our next tech adventure, take care, and happy experimenting!
Bubyeeeee….