ESP8266 OTA (Over-the-Air) Firmware Updates using AsyncElegantOTA Arduino Library.
Hey Guys… Welcome back to electronicsinnovation.com
In this video, we are going to see how to enable the OTA Firmware updating feature to the esp8266 module using the asyncElegantOTA Arduino library. also, we will walk through how to add this OTA feature to the existing esp8266 projects and what are the important things you need to consider while adding this feature to the existing projects.
This video is brought to you by pcbway.com,
Table of Contents:
PCBWay:
PCBWay is one of the best PCB manufacturers in the current industry.
PCBWay is offering services like PCB prototype, SMD Stencil, PCB assembly, Flexible PCBs & Advanced PCBs.
At PCBWay.com we can get 10 pieces of 2 layered PCBs at just $5 with 24 hours build time.
The Best part of PCBWay is the Instant quote feature, just enter the PCB size, choose the quantity, layers, and thickness. That’s it, we will get the instant quote. place an order by clicking on saving to cart.

Now, let’s dive into the episode.
Video Tutorial: ESP8266 OTA
This tutorial is also available in video format, you can watch the below videos or continue reading this article.
What is OTA programming in ESP8266?
A fantastic feature of any WiFi-enabled microcontroller is the ability to update its firmware wirelessly. This is known as Over-The-Air (OTA) firmware update.

The ESP8266 OTA programming allows updating/uploading a new program to ESP8266 using Wi-Fi instead of a physical connection of the ESP8266 with a computer via USB. OTA functionality is extremely useful in case of no physical access to the ESP8266 module. It helps to reduce the amount of time spent on updating each ESP module at the time of maintenance. One important feature of OTA is that one central location can send an update to multiple ESPs sharing the same network. The only disadvantage, you have to add an extra code for OTA with every sketch you upload, so that you’re able to use OTA in the next update otherwise you can’t.

There are so many ways to enable an OTA Firmware updating feature to the ESP8266 module, but I felt this AsyncElegantOTA Arduino library is the simplest way. I will explain to you why this is the simplest way in the next few minutes.
We will use the AsyncElegantOTA Arduino library to enable an OTA Firmware updating feature to the ESP8266 module. First of all, I would like to appreciate and thank Ayush Sharma the author of this library for his brilliant work.
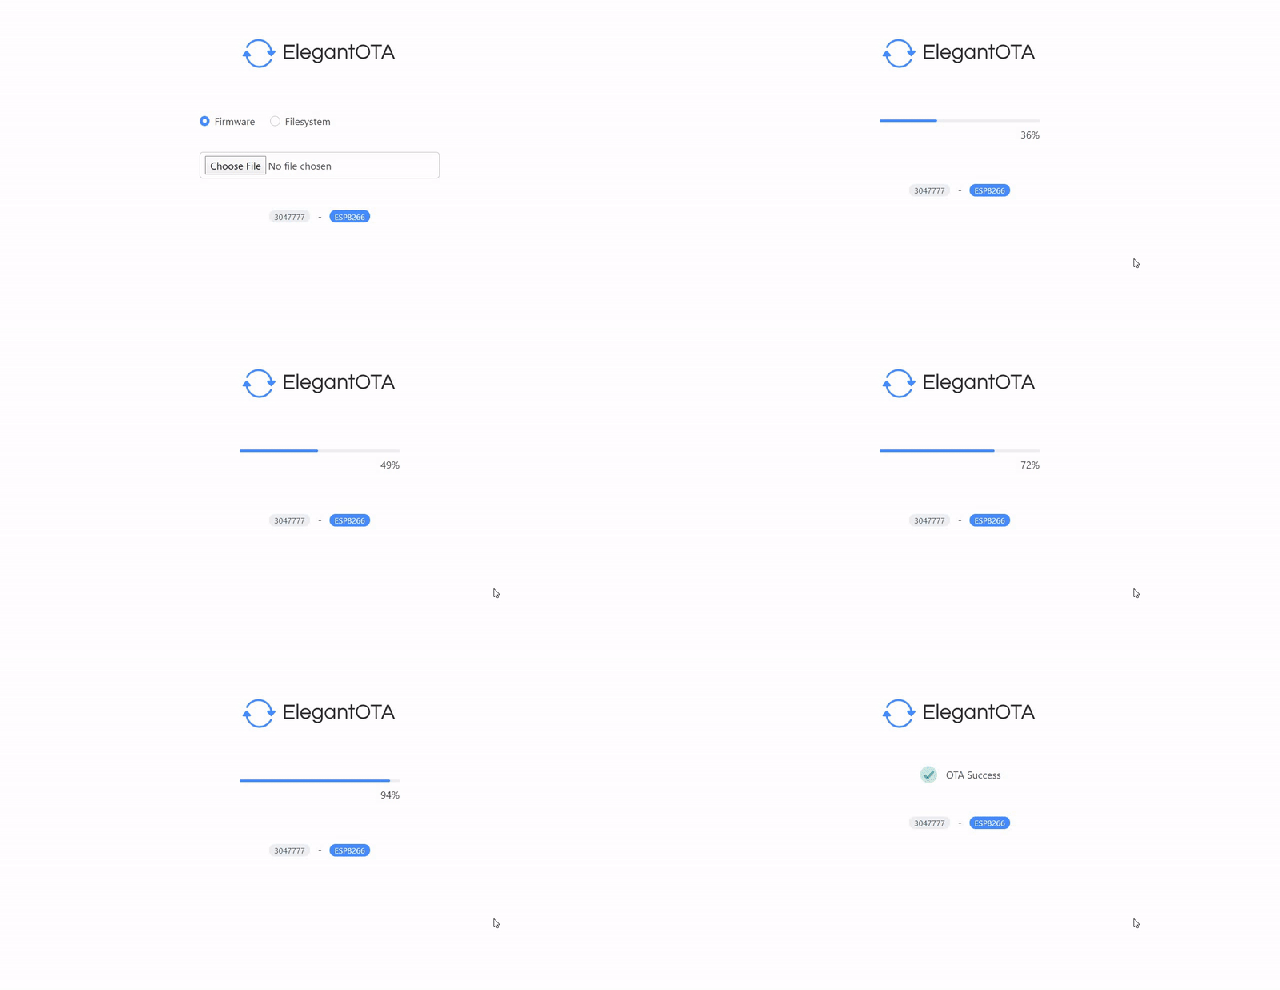
AsyncElegantOTA provides a beautiful interface to upload Over-the-Air updates to ESP Modules with precise status and progress displayed over UI.
This Library shows the current upload progress of your OTA and once finished, it will display the status of your OTA. This Version of the Library uses AsyncWebServer. we have to use “.bin” files of firmware while uploading to the ESP8266.

How to Install AsyncElegantOTA Arduino library?
Go to Sketch > Include Library > Library Manager > Search for “AsyncElegantOTA” > Install

As this library uses the AsyncWebServer library, we have to install the following libraries.
#include <AsyncTCP.h>
#include <ESPAsyncWebServer.h>
Once the Installation of libraries is completed,
open ESP8266_Async_demo sketch from Arduino Examples > AsyncElegantOTA

This is just an Asyncewebserver demo sketch with 3 AsyncElegantOTA library lines added.
Included AsyncElegantOTA Library at top of Code.
Added this – AsyncElegantOTA.begin(&server); line above this server.begin(); statement.
finally, added AsyncElegantOTA.loop(); in void loop. thats it.
You have to add these 3 lines to any existing ESP8266 based async web server projects to enable the OTA firmware update. very simple right. that why I stated above as this may be the simplest way to upgrade your ESP8266 projects to the OTA firmware update.
Let’s test this feature.
#include <ESP8266WiFi.h>
#include <ESPAsyncTCP.h>
#include <ESPAsyncWebServer.h>
#include <AsyncElegantOTA.h>

const char* ssid = "........";
const char* password = "........";

AsyncWebServer server(80);


void setup(void) {
  Serial.begin(115200);
  WiFi.mode(WIFI_STA);
  WiFi.begin(ssid, password);
  Serial.println("");

  // Wait for connection
  while (WiFi.status() != WL_CONNECTED) {
    delay(500);
    Serial.print(".");
  }
  Serial.println("");
  Serial.print("Connected to ");
  Serial.println(ssid);
  Serial.print("IP address: ");
  Serial.println(WiFi.localIP());

  server.on("/", HTTP_GET, [](AsyncWebServerRequest *request) {
    request->send(200, "text/plain", "Hi! I am ESP8266.");
  });

  AsyncElegantOTA.begin(&server);    // Start ElegantOTA
  server.begin();
  Serial.println("HTTP server started");
}

void loop(void) {
  AsyncElegantOTA.loop();
}
On the first go, we have to upload this code to the esp8266 manually. so, connect ESP8266 with the laptop, check uploading configurations and upload it.
After successful uploading, open serial monitor.

Now copy the IPAddress displayed over your Serial Monitor and go to http://<IPAddress>/ in the browser. ( where <IPAddress> is the IP of your ESP Module)
If the webserver working fine you will see the message on the webpage.

go to http://<IPAddress>/update in browser.
Now, a beautiful interface to upload Over-the-Air updates to ESP Modules will appear. here you can select either Firmware or Filesystem option based on the requirement.
This library will help you to transfer the Files like x509 Certificates, or Html webpages to the esp8266 file system using this option. you can upgrade the firmware using this firmware option.

I would like to upload blink sketch to the esp8266with OTA,
As I have already explained we have to use a .bin while sending to esp8266. so, first, convert your code to the binary file. In Arduino, you can do it very easily with this option.

The binary file will be saved along with the main code.

Select this code from the webpage, it will automatically upload.

after successful uploading, you can see the ESP8266 blinking as per the updated firmware. that’s it. we have made it.

Note: You have to add an extra code for OTA with every sketch you upload, so that you’re able to use OTA in the next update otherwise you can’t. This is one of the most important things you have to consider while enabling the OTA feature to the ESP8266 module.
So, That’s all about ESP8266 OTA (Over-the-Air) Firmware Updates using AsyncElegantOTA, I hope you have learned something new from this episode. Stay tuned to electronicsinoovation.com for more interesting projects and exciting features to your existing projects.
See you soon on the next interesting episode. bubyeeee…

This is fine and I have tested and it is working perfectly and I am from Sri Lanka.
Now, I have 3 questions as follows and I would humbly request your help and answer to these 2 questions.
1. How can I update the firmware of an ESP8266 which is not in the same network. Example: an ESP8266 which is about 10 or 100 Kms away from where I am located on OTA ?
2. How can I update various ESP8266 devices in several physical locations AND in different networks at the same time using OAT and with this code ?
3. how can you differentiate if there are 2 or more ESP8266 devices in the same location (in WAN or in LAN) which are doing different functions and if I need to send the update to one of those ESP8266 device (instead of sending to all those ESP8266 devices) in the same location, without uploading to the other ESP8266 devices ?
I am actually looking for a solution where I can cover the above 3 questions.
Please help me.