Table of Contents:
Introduction:
Interfacing MAX6675 with ESP32 and Display Temperature data on the webserver
Welcome to a series of Articless on Sensors. In the previous articles, we have interfaced MAX6675 sensor with Arduino and Displayed the Temperature data on both 16×2 LCD and OLED Display. Then we have performed Durability or Capability testing and determined the maximum temperature which is 1023.75 degrees Celcius.
In this video, we will interface this MAX6675 sensor with ESP32 and display the sensor data on the webserver.
So without wasting time lets get started.
PCBWay:
PCBWay.com is the one-stop solution for PCB Prototyping, Manufacturing, and PCB Assembly. Along with PCB prototype and SMD-Stencils PCBWay is also providing PCB Assembly within 3-4 day production time.
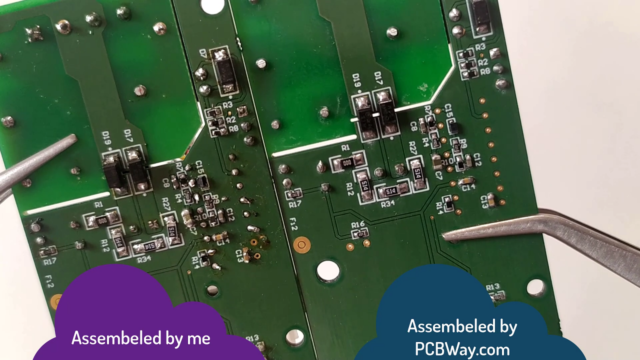
If you are using Very small SMD Components on your PCB, you cannot solder those tiny parts on the PCB, I have struggled a lot to assemble this PCB, But Finally, I have done it. Later I came to know about PCBway Assembling services of PCBway and get this done very easily with few mouse clicks. You can get your PCB Assembled easily from PCBWay.com.
Visit PCBway.com choose PCB Assembly, Quantity, No of unique parts, No of SMT Pads, No of Through holes then click on a quote now.

Check other advanced parameters here, then calculate. you can get it at $30 which is the best price in the current industry. Its actual price is 150 USD but currently, they are giving at 150USD and Also shipping free. In my case, I’m am getting a shipping benefit of 29 USD.
Complete the order, by clicking on the save to cart.
Video Tutorial: Interfacing MAX6675 with ESP32
This tutorial is also available in the video format, you can watch the below videos or continue reading this article.
Required Components:
1. Breadboard, (Buy from Amazon)
2. ESP32 Module (Buy from Amazon)
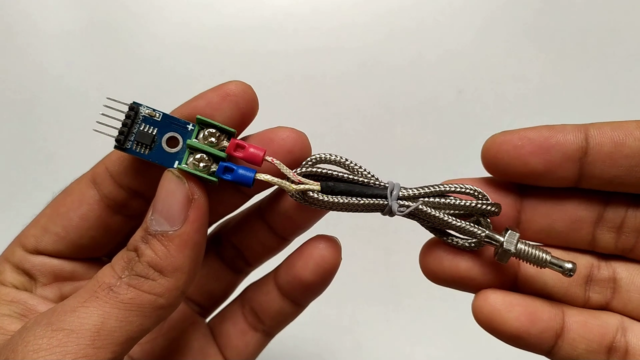
5. MAX6675 Sensor (Buy from Amazon)
7. connecting wires (Buy from Amazon)
Overview: MAX6675
Before jumping into the Hardware connection and programming, Let’s understand the facts and Capabilities of this sensor.
The MAX6675 performs cold-junction compensation and digitizes the signal from a K-type thermocouple. The output data in a 12-bit resolution, SPI compatible, read-only format. This converter resolves temperatures to 0.25°C, allows readings as high as +1024°C, and exhibits thermocouple accuracy of 8LSBs for temperatures ranging from 0°C to +700°C.
Direct digital conversion of Type -K thermocouple output
Cold-junction compensation
Simple SPI-compatible serial interface
Open thermocouple detection
Applications
Consumer Electronics, Industrial, Automotive
Absolute Maximum Ratings
Supply Voltage (VCC to GND) …………………………. -0.3V to +6V
Operating Temperature Range …………………….. -20°C to +85°C
Storage Temperature Range ……………………… -65°C to +150°C
Circuit Diagram: Interfacing MAX6675 with ESP32
Here is the circuit diagram to interface MAX6675 with ESP32 Module. After connections, the circuit will be something like this. ESP32 will read data from the sensor, and post the same data to the webserver. Then we can access the same data either from a mobile or Laptop browsers.

Source code: Interfacing MAX6675 with ESP32
Coming to the programming part, here is the code to interface max6675 with ESP32 Module. and print sensor data on the webserver.
#include <WiFi.h>
#include <WebServer.h>
#include "max6675.h" //https://github.com/adafruit/MAX6675-library
float t, tF;
/*Put your SSID & Password*/
const char* ssid = "The Dark Knight Rises";  // Enter SSID here
const char* password = "cheppanu";  //Enter Password here
WebServer server(80);

int thermoDO = 19; // SO of  MAX6675 module to D19
int thermoCS = 5; // CS of MAX6675 module to D5
int thermoCLK = 18; // SCK of MAX6675 module to D18

MAX6675 thermocouple(thermoCLK, thermoCS, thermoDO);
void setup() {
  Serial.begin(115200);
  delay(100);

  Serial.println("Connecting to ");
  Serial.println(ssid);

  //connect to your local wi-fi network
  WiFi.begin(ssid, password);
//check wi-fi is connected to wi-fi network
while (WiFi.status() != WL_CONNECTED) {
delay(1000);
Serial.print(".");
}
Serial.println("");
Serial.println("WiFi connected..!");
Serial.print("Got IP: ");  Serial.println(WiFi.localIP());
  server.on("/", handle_OnConnect);
  server.onNotFound(handle_NotFound);

  server.begin();
  Serial.println("HTTP server started");

}
void loop() {
  server.handleClient();
}
void handle_OnConnect() {
  t = thermocouple.readCelsius();
  tF = thermocouple.readFahrenheit();
    Serial.print("Deg C = ");
  Serial.println(t);
  Serial.print("\t Deg F = ");
  Serial.println(tF);
  Serial.println();
  server.send(200, "text/html", SendHTML(t,tF));
}
void handle_NotFound(){
  server.send(404, "text/plain", "Not found");
}
String SendHTML(float t,float tF){
String ptr = "<!DOCTYPE html>";
ptr +="<html>";
ptr +="<head>";
ptr +="<title>High Temperature Monitor</title>";
ptr +="<meta name='viewport' content='width=device-width, initial-scale=1.0'>";
ptr +="<link href='https://fonts.googleapis.com/css?family=Open+Sans:300,400,600' rel='stylesheet'>";
ptr +="<style>";
ptr +="html { font-family: 'Open Sans', sans-serif; display: block; margin: 0px auto; text-align: center;color: #444444;}";
ptr +="body{margin: 0px;} ";
ptr +="h1 {margin: 50px auto 30px;} ";
ptr +=".side-by-side{display: table-cell;vertical-align: middle;position: relative;}";
ptr +=".text{font-weight: 600;font-size: 19px;width: 200px;}";
ptr +=".reading{font-weight: 300;font-size: 50px;padding-right: 25px;}";
ptr +=".t .reading{color: #F29C1F;}";
ptr +=".tF .reading{color: #3B97D3;}";
ptr +=".superscript{font-size: 17px;font-weight: 600;position: absolute;top: 10px;}";
ptr +=".data{padding: 10px;}";
ptr +=".container{display: table;margin: 0 auto;}";
ptr +=".icon{width:65px}";
ptr +="</style>";
ptr +="<script>\n";
ptr +="setInterval(loadDoc,1000);\n";
ptr +="function loadDoc() {\n";
ptr +="var xhttp = new XMLHttpRequest();\n";
ptr +="xhttp.onreadystatechange = function() {\n";
ptr +="if (this.readyState == 4 && this.status == 200) {\n";
ptr +="document.body.innerHTML =this.responseText}\n";
ptr +="};\n";
ptr +="xhttp.open(\"GET\", \"/\", true);\n";
ptr +="xhttp.send();\n";
ptr +="}\n";
ptr +="</script>\n";
ptr +="</head>";
ptr +="<body>";
ptr +="<h1>High Temperature Monitor</h1>";
ptr +="<div class='container'>";
ptr +="<div class='data t'>";
ptr +="<div class='side-by-side icon'>";
ptr +="<svg enable-background='new 0 0 19.438 54.003'height=54.003px id=Layer_1 version=1.1 viewBox='0 0 19.438 54.003'width=19.438px x=0px xml:space=preserve xmlns=http://www.w3.org/2000/svg xmlns:xlink=http://www.w3.org/1999/xlink y=0px><g><path d='M11.976,8.82v-2h4.084V6.063C16.06,2.715,13.345,0,9.996,0H9.313C5.965,0,3.252,2.715,3.252,6.063v30.982";
ptr +="C1.261,38.825,0,41.403,0,44.286c0,5.367,4.351,9.718,9.719,9.718c5.368,0,9.719-4.351,9.719-9.718";
ptr +="c0-2.943-1.312-5.574-3.378-7.355V18.436h-3.914v-2h3.914v-2.808h-4.084v-2h4.084V8.82H11.976z M15.302,44.833";
ptr +="c0,3.083-2.5,5.583-5.583,5.583s-5.583-2.5-5.583-5.583c0-2.279,1.368-4.236,3.326-5.104V24.257C7.462,23.01,8.472,22,9.719,22";
ptr +="s2.257,1.01,2.257,2.257V39.73C13.934,40.597,15.302,42.554,15.302,44.833z'fill=#F29C21 /></g></svg>";
ptr +="</div>";
ptr +="<div class='side-by-side text'>Temp in Celsius</div>";
ptr +="<div class='side-by-side reading'>";
ptr +=(int)t;
ptr +="<span class='superscript'>°C</span></div>";
ptr +="</div>";
ptr +="<div class='data tF'>";
ptr +="<div class='side-by-side icon'>";
ptr +="<svg enable-background='new 0 0 19.438 54.003'height=54.003px id=Layer_1 version=1.1 viewBox='0 0 19.438 54.003'width=19.438px x=0px xml:space=preserve xmlns=http://www.w3.org/2000/svg xmlns:xlink=http://www.w3.org/1999/xlink y=0px><g><path d='M11.976,8.82v-2h4.084V6.063C16.06,2.715,13.345,0,9.996,0H9.313C5.965,0,3.252,2.715,3.252,6.063v30.982";
ptr +="C1.261,38.825,0,41.403,0,44.286c0,5.367,4.351,9.718,9.719,9.718c5.368,0,9.719-4.351,9.719-9.718";
ptr +="c0-2.943-1.312-5.574-3.378-7.355V18.436h-3.914v-2h3.914v-2.808h-4.084v-2h4.084V8.82H11.976z M15.302,44.833";
ptr +="c0,3.083-2.5,5.583-5.583,5.583s-5.583-2.5-5.583-5.583c0-2.279,1.368-4.236,3.326-5.104V24.257C7.462,23.01,8.472,22,9.719,22";
ptr +="s2.257,1.01,2.257,2.257V39.73C13.934,40.597,15.302,42.554,15.302,44.833z'fill=#3C97D3 /></g></svg>";
ptr +="</div>";
ptr +="<div class='side-by-side text'>Temp in Fahrenheit</div>";
ptr +="<div class='side-by-side reading'>";
ptr +=(int)tF;
ptr +="<span class='superscript'>°F</span></div>";
ptr +="</div>";
ptr +="</body>";
ptr +="</html>";
return ptr;
}
Code Detailed Explanation:
These are the libraries we are using, these 2 libraries are pre-installed. you don’t have to install them again. we have to install the max6675 library, We can install it directly from the Arduino Library manager itself. Goto library manager, type name of the library which is “MAX6675” and install it.
#include <WiFi.h> #include <WebServer.h> #include "max6675.h" //https://github.com/adafruit/MAX6675-library
These are the variables to store temperature in Celcius and Fahrenheit.
float t, tF;
Provide WiFi SSID and password for Local Area Network connection, Later we will connect to the same WiFi to access the sensor data
/*Put your SSID & Password*/ const char* ssid = "The Dark Knight Rises"; // Enter SSID here const char* password = "cheppanu"; //Enter Password here
Initializing webserver at port 80, Declaration of sensor pins, Data output as 19, Chipselect as 5, Clock as 18. Creating a max6675 object and passing pin no as parameters.
WebServer server(80); int thermoDO = 19; // SO of MAX6675 module to D19 int thermoCS = 5; // CS of MAX6675 module to D5 int thermoCLK = 18; // SCK of MAX6675 module to D18 MAX6675 thermocouple(thermoCLK, thermoCS, thermoDO);
coming to the void setup, initializing serial monitor at 115200 baudrate, Initializing wifi connection with previously entered SSID and Password.
void setup() {
Serial.begin(115200);
delay(100);
Serial.println("Connecting to ");
Serial.println(ssid);
//connect to your local wi-fi network
WiFi.begin(ssid, password);
If wifi status is not connected, printing a dot on the serial monitor with 1000 milliseconds delay. If wifi Status is connected, printing the same message along with Local IP, This IP will be used to access the webserver later in the video.
//check wi-fi is connected to wi-fi network
while (WiFi.status() != WL_CONNECTED) {
delay(1000);
Serial.print(".");
}
Serial.println("");
Serial.println("WiFi connected..!");
Serial.print("Got IP: "); Serial.println(WiFi.localIP());
beginning the server and calling the functions on different server actions.
server.on("/", handle_OnConnect);
server.onNotFound(handle_NotFound);
server.begin();
Serial.println("HTTP server started");
}
Coming to the void loop, simply handling the client.
void loop() {
server.handleClient();
}
In Function handle_onconnect
Reading Sensor data and storing into the variables,
The temperature in Celcius format is being stored in the variable t, and Fahrenheit is being stored on the “tf”, then printing same data on the serial monitor.
Then passing the t, and tF to another function Send HTML
void handle_OnConnect() {
t = thermocouple.readCelsius();
tF = thermocouple.readFahrenheit();
Serial.print("Deg C = ");
Serial.println(t);
Serial.print("\t Deg F = ");
Serial.println(tF);
Serial.println();
server.send(200, "text/html", SendHTML(t,tF));
}
In Function handle_NotFound
Printing plain text “Not found” on the webpage.
void handle_NotFound(){
server.send(404, "text/plain", "Not found");
}
Here is the function SendHTML, which is the heart of the code. This function is responsible for making a webpage, displaying the sensor data, and refreshing the sensor data without reloading the page.
This is the beauty part of the code, This block of code is used to refresh the sensor data without reloading the page.
ptr +="setInterval(loadDoc,1000);\n";
ptr +="function loadDoc() {\n";
ptr +="var xhttp = new XMLHttpRequest();\n";
ptr +="xhttp.onreadystatechange = function() {\n";
ptr +="if (this.readyState == 4 && this.status == 200) {\n";
ptr +="document.body.innerHTML =this.responseText}\n";
ptr +="};\n";
ptr +="xhttp.open(\"GET\", \"/\", true);\n";
ptr +="xhttp.send();\n";
ptr +="}\n";
ptr +="</script>\n";
This bock of code is used to show the Temperature in Celcius format on the webpage,
ptr +="<h1>High Temperature Monitor</h1>"; ptr +="<div class='container'>"; ptr +="<div class='data t'>"; ptr +="<div class='side-by-side icon'>"; ptr +="<svg enable-background='new 0 0 19.438 54.003'height=54.003px id=Layer_1 version=1.1 viewBox='0 0 19.438 54.003'width=19.438px x=0px xml:space=preserve xmlns=http://www.w3.org/2000/svg xmlns:xlink=http://www.w3.org/1999/xlink y=0px><g><path d='M11.976,8.82v-2h4.084V6.063C16.06,2.715,13.345,0,9.996,0H9.313C5.965,0,3.252,2.715,3.252,6.063v30.982"; ptr +="C1.261,38.825,0,41.403,0,44.286c0,5.367,4.351,9.718,9.719,9.718c5.368,0,9.719-4.351,9.719-9.718"; ptr +="c0-2.943-1.312-5.574-3.378-7.355V18.436h-3.914v-2h3.914v-2.808h-4.084v-2h4.084V8.82H11.976z M15.302,44.833"; ptr +="c0,3.083-2.5,5.583-5.583,5.583s-5.583-2.5-5.583-5.583c0-2.279,1.368-4.236,3.326-5.104V24.257C7.462,23.01,8.472,22,9.719,22"; ptr +="s2.257,1.01,2.257,2.257V39.73C13.934,40.597,15.302,42.554,15.302,44.833z'fill=#F29C21 /></g></svg>"; ptr +="</div>"; ptr +="<div class='side-by-side text'>Temp in Celsius</div>"; ptr +="<div class='side-by-side reading'>"; ptr +=(int)t; ptr +="<span class='superscript'>°C</span></div>"; ptr +="</div>";
This block is used to show the temperature in Fahrenheit format.
ptr +="<div class='data tF'>"; ptr +="<div class='side-by-side icon'>"; ptr +="<svg enable-background='new 0 0 19.438 54.003'height=54.003px id=Layer_1 version=1.1 viewBox='0 0 19.438 54.003'width=19.438px x=0px xml:space=preserve xmlns=http://www.w3.org/2000/svg xmlns:xlink=http://www.w3.org/1999/xlink y=0px><g><path d='M11.976,8.82v-2h4.084V6.063C16.06,2.715,13.345,0,9.996,0H9.313C5.965,0,3.252,2.715,3.252,6.063v30.982"; ptr +="C1.261,38.825,0,41.403,0,44.286c0,5.367,4.351,9.718,9.719,9.718c5.368,0,9.719-4.351,9.719-9.718"; ptr +="c0-2.943-1.312-5.574-3.378-7.355V18.436h-3.914v-2h3.914v-2.808h-4.084v-2h4.084V8.82H11.976z M15.302,44.833"; ptr +="c0,3.083-2.5,5.583-5.583,5.583s-5.583-2.5-5.583-5.583c0-2.279,1.368-4.236,3.326-5.104V24.257C7.462,23.01,8.472,22,9.719,22"; ptr +="s2.257,1.01,2.257,2.257V39.73C13.934,40.597,15.302,42.554,15.302,44.833z'fill=#3C97D3 /></g></svg>"; ptr +="</div>"; ptr +="<div class='side-by-side text'>Temp in Fahrenheit</div>"; ptr +="<div class='side-by-side reading'>"; ptr +=(int)tF; ptr +="<span class='superscript'>°F</span></div>"; ptr +="</div>";
Uploading code to ESP32:
Connect the ESP32 module with a laptop. Check the uploading configuration Board: ESP32 Dev Module, Uploading speed, and select the right port.
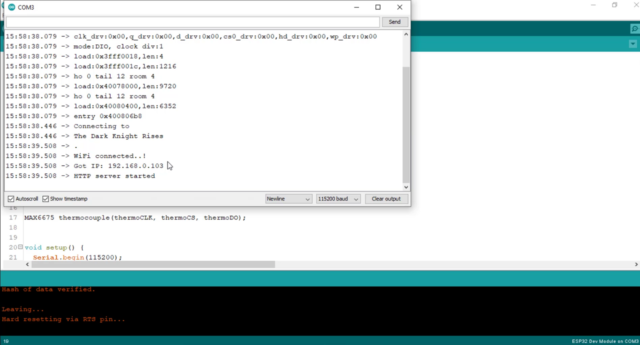
If everything okay, upload the code. After successful uploading open the serial monitor and then restart the ESP32 module. On the Serial monitor, we can see our ESP32 successfully connected to the programmed wifi and allocated with IP address. This IP address is important for us.
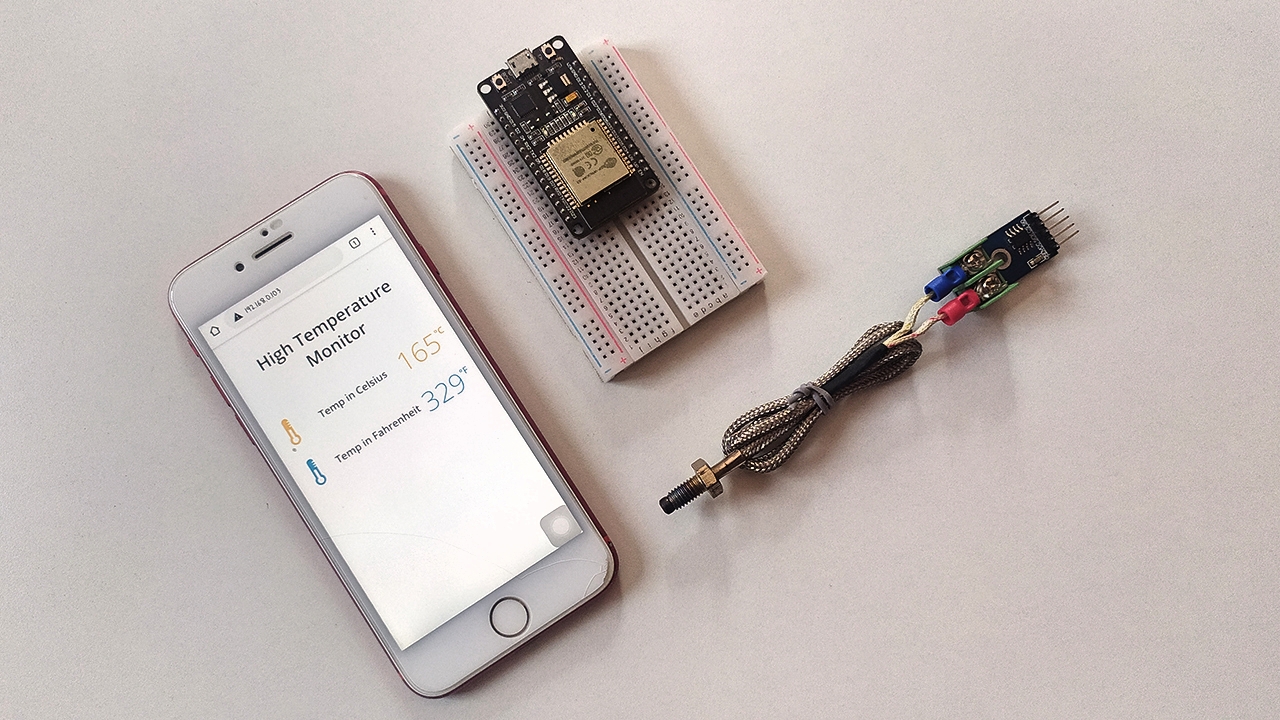
Now Takeout the mobile and make sure you have connected to the same wifi esp32 connected, in my case, it is The dark knight rises, So Both ESP32 and my mobile are connected to The Dark knight rises only. Now point your browser to the local Ip of ESP32 which acquired from the Serial monitor.
You can see the Webpage with Temperature readings. You can See the Temperature in both Celsius and Fahrenheit format on the webpage. you can also see the Temperature readings being updated without reloading the webpage. that’s the beauty of this project I feel.

Video Tutorial: Interfacing MAX6675 with ESP32
This tutorial is also available in the video format, you can watch the below videos or continue reading this article.