
Recharge Hub for Lithium-ion Batteries | How do Li-ion batteries work? | TP4056
Do you remember the last time when I promise to concentrate more on the hardware part and provide you the complete guide on the PCB designing, manufacturing, and Assembling process?
I believe I even had long hair the last time when I was promised.
So, It has been a while and the wait is over, In this series, we are gonna walk through PCB Designing with Altium designer and PCB manufacturing by PCBWay.com One of the best manufacturers in the Current PCB industry. Also, they are offering 10 pcs of 2 layered PCBs at just $5, Get your PCBs ready by PCBway.com now. PCBWay.com is the one-stop solution for PCB Prototyping, Manufacturing, and PCB Assembly. Along with PCB prototype and SMD-Stencils PCBWay is also providing PCB Assembly within 3-4 day production time. Finally, we will cover the PCB Assembly part in my lab.

So, without wasting time let’s get started.
Table of Contents:
Video Tutorial:
This tutorial is also available in video format, you can watch the below videos or continue reading this article.
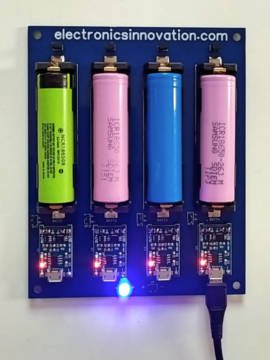
In this project, we are gonna make a Recharge hub for 18650 Lithium-ion Batteries I need this Recharge hub for my next projects which are in pipeline.
before jumping into the PCB designing and Manufacturing part, Let’s understand the theory behind the Li-ion Batteries.
How does Lithium-ion Batteries work?
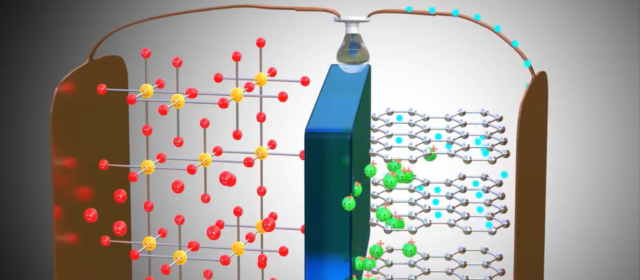
In a practical cell, the graphite and metal oxide are coated onto copper and aluminum foils. the foils act as current collectors here, and the positive and negative tabs can be easily taken out from the current collectors and organic salt of lithium acts as the electrolyte and it is coated onto the separator sheet. all these three sheets round onto the cylinder around a central steel cores do making the cell more compact.
If we wanted to charge this Battery We need to connect a Power source which has a higher potential difference than Battery.
when you connect to a power source across this arrangement, the positive side of the power source will obviously attract and remove electrons from the lithium atoms of the metal oxide.
these electrons flow through the external circuit as they cannot flow through the electrolyte and reach the graphite layer. in the meantime the positively charged lithium ions we’ll be attracted towards the negative terminal and will flow through the electrolyte. lithium ions also reached the graphite layer space and get trap there once all the lithium atoms reached the graphite sheet the cell is fully charged. please note that the graphite does not have a role in the chemical reaction of the LithumIon Cells. It just acts as a storage medium.

A fully charged battery is used to powerup any circuit or Load. as soon as the power sources removed and a load is connected, the lithium ions want to go back to their stable state as a part of the metal oxide. due to this tendency, the lithium ions move through the electrolyte and electrons by the load. thus we get an electrical current through the load, Once all the electrons and lithium Ions reached Metalloxide the battery is Discharged.
If we connect this to the Power source, The battery will get charged again. This process will be repeated.
TP4056:-
There are different types of Lithium-Ion batteries I have, The size or shape of the battery is different, but deep inside all batteries are working on the same principle. But While charging these batteries, we need to take care of a few precautionary measures such as charging current controlling, Overcharge and Over-discharge protection, and reverse voltage protection. Usually, an In built Battery Management System (BMS)is used to take care of all these things. But 18650 Does not have any inbuilt BMS.So, we should provide one when we are charging it, When I Search for a BMS for Lithium-ion Batteries, I found this tiny PCB with TP4056 IC on the internet.
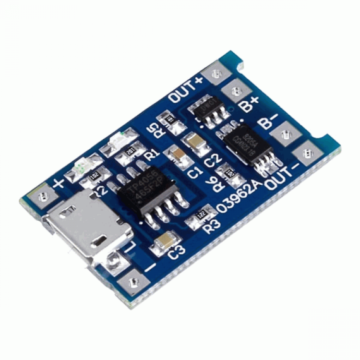
This module is made for charging rechargeable lithium batteries using the constant-current to constant-voltage (CC/CV) charging method. In addition to safely charging a lithium battery, the module also provides the necessary protection required by lithium batteries and also Includes two indicator LEDs. Red LED indicates charging. Blue or Green LED indicates charge complete.
This module uses both the TP4056 and the DW01A Li-Ion battery protection IC, which together in combination provide the following protection features:
Manage the constant current to constant voltage charging of a connected lithium battery
Overcharge protection – the module will safely charge your battery to 4.2V, a healthy maximum voltage level for your battery
Over-discharge protection – keeps your battery from being discharged below 2.4V, a healthy minimum voltage level for your battery
Overcurrent and short-circuit protection – the module will cut the output from the battery if the discharge rate exceeds 3A or if a short-circuit condition occurs.
Trickle charge – if the voltage level of the connected battery is less than 2.9V, the module will use a trickle charge current of 130mA until the battery voltage reaches 2.9V,
After going through all these features, I decided This Module is best for Battery Management System for the 18650 packages of Li-ion batteries.
Recharge Hub for Lithium-ion Batteries:-
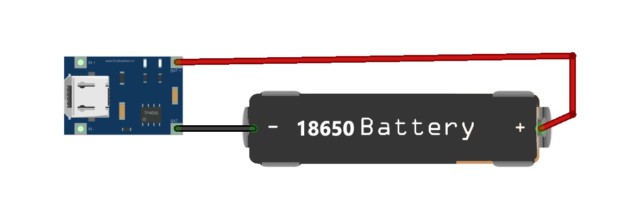
This is the simple circuit to charge the LI-Ion 18650 battery.
I wanted to make a hub that can charge up to 4 batteries at a time. I thought PCB is the best way to manage these batteries and Charge safely and eliminate all the messy connections. So, This could be the Circuit for 4 batteries charging hub.
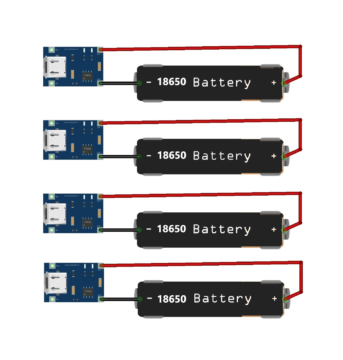
Here I am gonna use one Tp4056 module for one 18650 Lithium-ion Batteries. we can also use one TP4056 module to charge more than a single battery by connecting all batteries in parallel.
when connecting two cells in parallel. Both cells must be at the same voltage level
otherwise if one cell has a lower voltage than the companion cell the higher voltage cell will discharge into the lower voltage cell in an attempt to bring the two cells to the same voltage, which will eventually balance out, but if the voltages of the two cells differ enough the resulting current through both cells can be high enough to cause the cells to overheat or worse.
When charging two parallel cells connected to this charge module the charge current through each cell will be half of the total charge current. that is if each of the cells has equivalent voltage levels.
By keeping in mind these two issues, I decided to use a single TP4056 module for a single Battery.
So, in the Next Article. we will walk through the PCB Designing of this Lithium-Ion Charging hub with Altium, and PCB Manufacturing by PCBway.com and PCB Assembly.
So, That’s it for this tutorial. See you in the next episode. Bubyee…
Video Tutorial:
This tutorial is also available in video format, you can watch the below videos or continue reading this article.
[…] circuit to charge Lithium-ion batteries with TP4056, we have already covered this part in the previous article. If you miss it by chance, complete reading it, and then come back to […]