Table of Contents:
Introduction:
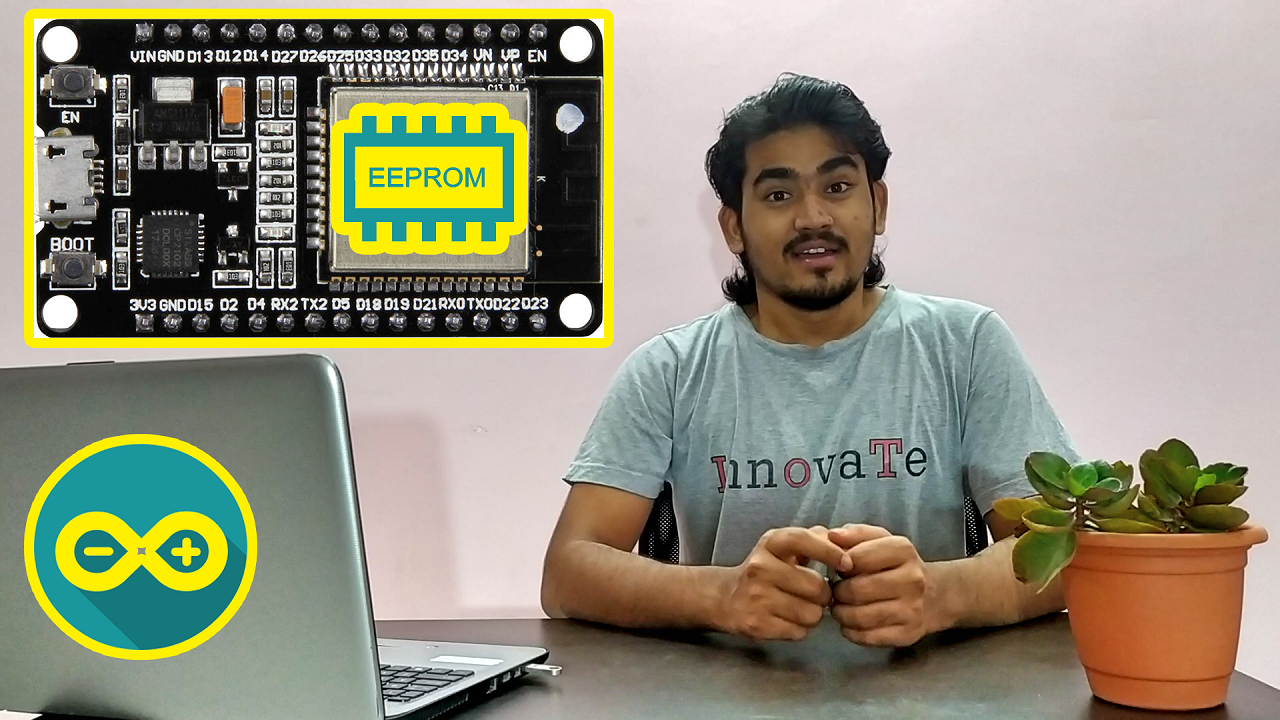
In this article, we are going to walk through ” how to Change & Store ESP32 WiFi credentials in EEPROM without uploading code from Arduino IDE”, We will update WiFi Credential wirelessly and store the same credentials in the EEPROM memory of the ESP32 using a really awesome library “EEPROM.h“. We are going to develop an Arduino Program, Which First Reads the WiFi Credentials from the EEPROM, and tries to connect to that; If the WiFi is not available or there are no credentials stored in the EEPROM, ESP32 will Acts an Accespoint and creates a Hotspot which will allow us to connect and modify the WiFi credential. Then it connects to the freshly configured WiFi Credentials. It will only take a couple of minutes to go through these steps.
So, without wasting time let’s get started.
PCBway:
If you want to convert your prototype projects to realtime, applications & deploy in the realtime field, You need to design a PCB, because Devices with these Veroboards will not last long.

PCB way is one of the best ways to convert your prototypes into realtime applications. I have used their services to convert my prototypes into the realtime Applications.

PCBWAY is one of the best PCB manufacturers in the current industry. At PCBway.com we can get 10 pieces of 2 layered PCBs at just $5 with 24 hours build time & also PCB way offering PCB assembly services at just $30 along with Free shipping. PCBway is also offering services like PCB prototype, SMD Stencil, PCB assembly, Flexible PCBs & Advanced PCBs. The best part of PCBway is the Instant quote feature, just enter the PCB size, choose the quantity, layers, and thickness. That’s it, we will get the instant quote. place an order by clicking on saving to cart. check out their website for more details.

Video Tutorial:
This tutorial is also available in the video format, you can watch the below videos or continue reading this article.
Required Components:
- Breadboard (Buy on Amazon)
- ESP32 Module (Buy on Amazon)
- 10k Resistor (Buy on Amazon)
- Push-button (Buy on Amazon)
- Connecting wires (Buy on Amazon)
- Data Cable to Program ESP32. (Buy on Amazon)
Why change WiFi Credentials wirelessly???
If you have hard-coded values in your sketch, if you change your WiFi router or want to bring your device to somewhere else, you have to re-program your esp32, which isn’t ideal!
It also makes your sketches less sharable, as you probably will want to replace your SSID and Password with placeholders before uploading to somewhere public like GitHub and anyone who is using your code is going to have to update the code before they can use it on their network. This is why we should have WiFi Provisioning in our solutions. Even all IoT Devices that are available in the market have this WiFi Provisioning Feature.
What is WiFi Provisioning???
Provisioning IoT products, that do not have a keyboard and display as a user interface, in a simple and robust way is a significant challenge.
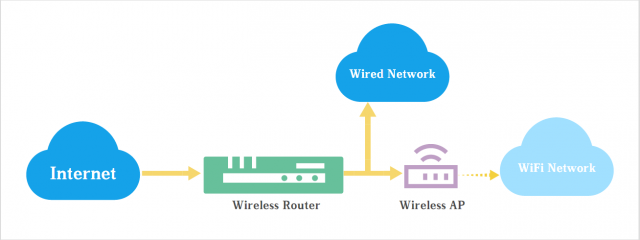
Wi-Fi provisioning is the process of connecting a new Wi-Fi device (station) to a Wi-Fi network. The provisioning process involves loading the station with the network name (often referred to as SSID) and its security credentials. In this process, The target device will first act as an access point and allow us to connect and modify the WiFi credential.
What is Acces Point???
“An access point is a device that creates a wireless local area network. or WLAN, usually in an office or large building. An access point sometimes connects to a wired router, switch, or hub via an Ethernet cable, and projects a Wi-Fi signal to a designated area. It is also used for users to configure IoT devices for first-time use, or password changes”
Program & Source Code: Change ESP32 WiFi credentials without uploading code
The Program is designed to follow the below steps.
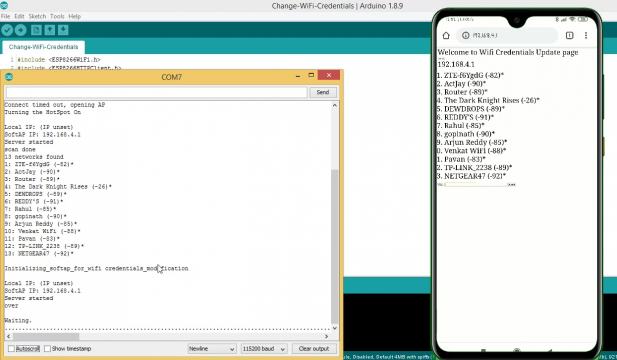
- On First boot, ESP32 will be in set up Station mode, and Read the pre-registered SSID and password combination and tries to connect to the same.
- If this process fails, it sets the ESP into Access Point mode and creates Open Wifi(Not protected with Password);
- This open wifi will allow the user to connect Using any Wi-Fi enabled device with a browser
- After establishing a connection with the Access point, you can go to the default IP address 192.168.4.1 to open a web page that allows user to configure your SSID and password;
- Once a new SSID and password is set, the ESP reboots and tries to connect;
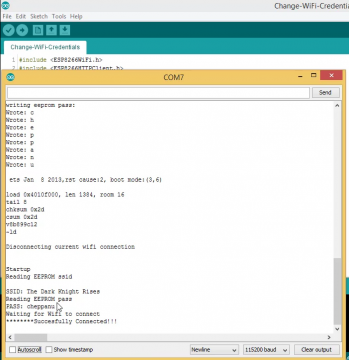
- If it establishes a connection, the process is completed successfully. and prints the following message “Connected to <EEPROM SSID> Successfully“
- If the connection fails again, it will be set up as an Access Point to configure the new SSID and Password.
Each and Every block of the code explained in the Video, you can refer to the video for the detailed explanation.
#include <WiFi.h>
#include <HTTPClient.h>
#include <WebServer.h>
#include <EEPROM.h>

//Variables
int i = 0;
int statusCode;
const char* ssid = "Default SSID";
const char* passphrase = "Default passord";
String st;
String content;
String esid;
String epass = "";


//Function Decalration
bool testWifi(void);
void launchWeb(void);
void setupAP(void);

//Establishing Local server at port 80
WebServer server(80);

void setup()
{

  Serial.begin(115200); //Initialising if(DEBUG)Serial Monitor
  Serial.println();
  Serial.println("Disconnecting current wifi connection");
  WiFi.disconnect();
  EEPROM.begin(512); //Initialasing EEPROM
  delay(10);
  pinMode(15, INPUT);
  Serial.println();
  Serial.println();
  Serial.println("Startup");

  //---------------------------------------- Read eeprom for ssid and pass
  Serial.println("Reading EEPROM ssid");


  for (int i = 0; i < 32; ++i)
  {
    esid += char(EEPROM.read(i));
  }
  Serial.println();
  Serial.print("SSID: ");
  Serial.println(esid);
  Serial.println("Reading EEPROM pass");

  for (int i = 32; i < 96; ++i)
  {
    epass += char(EEPROM.read(i));
  }
  Serial.print("PASS: ");
  Serial.println(epass);


  WiFi.begin(esid.c_str(), epass.c_str());
}
void loop() {

  if ((WiFi.status() == WL_CONNECTED))
  {

    for (int i = 0; i < 10; i++)
    {
      Serial.print("Connected to ");
      Serial.print(esid);
      Serial.println(" Successfully");
      delay(100);
    }

  }
  else
  {
  }

  if (testWifi() && (digitalRead(15) != 1))
  {
    Serial.println(" connection status positive");
    return;
  }
  else
  {
    Serial.println("Connection Status Negative / D15 HIGH");
    Serial.println("Turning the HotSpot On");
    launchWeb();
    setupAP();// Setup HotSpot
  }

  Serial.println();
  Serial.println("Waiting.");

  while ((WiFi.status() != WL_CONNECTED))
  {
    Serial.print(".");
    delay(100);
    server.handleClient();
  }
  delay(1000);
}


//----------------------------------------------- Fuctions used for WiFi credentials saving and connecting to it which you do not need to change
bool testWifi(void)
{
  int c = 0;
  //Serial.println("Waiting for Wifi to connect");
  while ( c < 20 ) {
    if (WiFi.status() == WL_CONNECTED)
    {
      return true;
    }
    delay(500);
    Serial.print("*");
    c++;
  }
  Serial.println("");
  Serial.println("Connect timed out, opening AP");
  return false;
}

void launchWeb()
{
  Serial.println("");
  if (WiFi.status() == WL_CONNECTED)
    Serial.println("WiFi connected");
  Serial.print("Local IP: ");
  Serial.println(WiFi.localIP());
  Serial.print("SoftAP IP: ");
  Serial.println(WiFi.softAPIP());
  createWebServer();
  // Start the server
  server.begin();
  Serial.println("Server started");
}

void setupAP(void)
{
  WiFi.mode(WIFI_STA);
  WiFi.disconnect();
  delay(100);
  int n = WiFi.scanNetworks();
  Serial.println("scan done");
  if (n == 0)
    Serial.println("no networks found");
  else
  {
    Serial.print(n);
    Serial.println(" networks found");
    for (int i = 0; i < n; ++i)
    {
      // Print SSID and RSSI for each network found
      Serial.print(i + 1);
      Serial.print(": ");
      Serial.print(WiFi.SSID(i));
      Serial.print(" (");
      Serial.print(WiFi.RSSI(i));
      Serial.print(")");
      //Serial.println((WiFi.encryptionType(i) == ENC_TYPE_NONE) ? " " : "*");
      delay(10);
    }
  }
  Serial.println("");
  st = "<ol>";
  for (int i = 0; i < n; ++i)
  {
    // Print SSID and RSSI for each network found
    st += "<li>";
    st += WiFi.SSID(i);
    st += " (";
    st += WiFi.RSSI(i);

    st += ")";
    //st += (WiFi.encryptionType(i) == ENC_TYPE_NONE) ? " " : "*";
    st += "</li>";
  }
  st += "</ol>";
  delay(100);
  WiFi.softAP("ElectronicsInnovation", "");
  Serial.println("Initializing_softap_for_wifi credentials_modification");
  launchWeb();
  Serial.println("over");
}

void createWebServer()
{
  {
    server.on("/", []() {

      IPAddress ip = WiFi.softAPIP();
      String ipStr = String(ip[0]) + '.' + String(ip[1]) + '.' + String(ip[2]) + '.' + String(ip[3]);
      content = "<!DOCTYPE HTML>\r\n<html>Welcome to Wifi Credentials Update page";
      content += "<form action=\"/scan\" method=\"POST\"><input type=\"submit\" value=\"scan\"></form>";
      content += ipStr;
      content += "<p>";
      content += st;
      content += "</p><form method='get' action='setting'><label>SSID: </label><input name='ssid' length=32><input name='pass' length=64><input type='submit'></form>";
      content += "</html>";
      server.send(200, "text/html", content);
    });
    server.on("/scan", []() {
      //setupAP();
      IPAddress ip = WiFi.softAPIP();
      String ipStr = String(ip[0]) + '.' + String(ip[1]) + '.' + String(ip[2]) + '.' + String(ip[3]);

      content = "<!DOCTYPE HTML>\r\n<html>go back";
      server.send(200, "text/html", content);
    });

    server.on("/setting", []() {
      String qsid = server.arg("ssid");
      String qpass = server.arg("pass");
      if (qsid.length() > 0 && qpass.length() > 0) {
        Serial.println("clearing eeprom");
        for (int i = 0; i < 96; ++i) {
          EEPROM.write(i, 0);
        }
        Serial.println(qsid);
        Serial.println("");
        Serial.println(qpass);
        Serial.println("");

        Serial.println("writing eeprom ssid:");
        for (int i = 0; i < qsid.length(); ++i)
        {
          EEPROM.write(i, qsid[i]);
          Serial.print("Wrote: ");
          Serial.println(qsid[i]);
        }
        Serial.println("writing eeprom pass:");
        for (int i = 0; i < qpass.length(); ++i)
        {
          EEPROM.write(32 + i, qpass[i]);
          Serial.print("Wrote: ");
          Serial.println(qpass[i]);
        }
        EEPROM.commit();

        content = "{\"Success\":\"saved to eeprom... reset to boot into new wifi\"}";
        statusCode = 200;
        ESP.restart();
      } else {
        content = "{\"Error\":\"404 not found\"}";
        statusCode = 404;
        Serial.println("Sending 404");
      }
      server.sendHeader("Access-Control-Allow-Origin", "*");
      server.send(statusCode, "application/json", content);

    });
  }
}
Final Output:
Webpage for WiFi Credential Updating:
After Successful Updating, the following message will be displayed on the serial monitor and ESP32 will connect to the Configured WiFi and Starts blinking with 1000 milliseconds delay.
Good one Subbu ji..
However, There should be a mechanism to RESET the EEPROM data as well, so that the project makes it 100% portable.!
Thanks for the explanation.
Ignore the comment ..I saw the RESET switch! 🙂 Thanks
Where is the RESET switch
how to create the another web server to control the leds…….
is there any option to send wifi credentials without html page from mobile device?
I have NodeMCU-32s and can’t upload the sketch what boards casn I use and what board to select in Tools Boards