
Table of Contents:
Introduction: DIY WiFi Jammer
In this article, I’m gonna hack wifi router with this tiny esp8266 module. we can call this as DIY WiFi Jammer or WiFi Deauther. In this process, we are gonna see about two attacks, one Deauther attack, and the other is a beacon attack.
So, without wasting time let’s get started.
PCBway:
If you want to convert your prototype projects to realtime, applications & deploy in the realtime field, You need to design a PCB, because Devices with these Veroboards will not last long.

PCB way is one of the best ways to convert your prototypes into realtime applications. I have used their services to convert my prototypes into the realtime Applications.

PCBWAY is one of the best PCB manufacturers in the current industry. At PCBway.com we can get 10 pieces of 2 layered PCBs at just $5 with 24 hours build time & also PCB way offering PCB assembly services at just $30 along with Free shipping. PCBway is also offering services like PCB prototype, SMD Stencil, PCB assembly, Flexible PCBs & Advanced PCBs. The best part of PCBway is the Instant quote feature, just enter the PCB size, choose the quantity, layers, and thickness. That’s it, we will get the instant quote. place an order by clicking on saving to cart. check out their website for more details.

Video Tutorial: DIY WiFi Jammer
This tutorial is also available in the video format, you can watch the below videos or continue reading this article.
Required Components: DIY WiFi Extender
Programming NodeMCU ESP8266 Module: DIY WiFi Jammer
We are not going to write any code for this project, rather we will use predeveloped firmware. We should be thankful to spacehuhn Technologies for their excellent work on developing firmware for this project. We will use a binary file to program the esp8266. So, Download the code from the below link. after visiting that below link scroll down, you will find the “deauther 2.1.0 1mb.bin” file, Download this file only.
GitHub link: https://github.com/martin-ger/esp_wifi_repeater
Since we are using bin files, we need a flash downloader. We will use this Flash download tool from espressif.com, We can use this tool to program both esp8266 and esp32 modules.
So Download this tool from the below link.
Flash Download Tool: https://www.espressif.com/en/support/download/other-tools
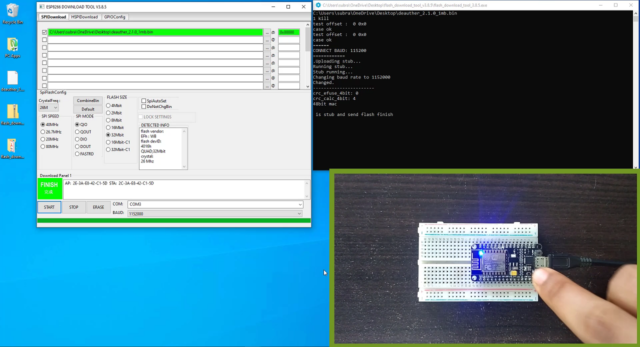
Once the files are downloaded extract them. Open the Flash download tool folder and Execute this Flash download tool application file as administrator. The command prompt will open, then a small window with two options will open. Select the Developer Mode option.
Since I am using ESP8266, I will select the ESP8266 Download tool. If you are using esp32 you can select the 3rd option, but the process will be the same for both modules.
Make sure it is in the SPI download option, Then Select the bin file from its directory. Enter the Address on the right column. don’t forget to check the file.
Then Check the configurations Crystal freq 26M, SPI Speed 40 MHz, SPI Mode QIO, Flash size 32 Mbits. Connect the NodeMCU with Laptop and select the right port and baud rate. Then click on the start button to begin the uploading process.
Once the code flashing process is finished, restart the ESP8266.
If the firmware is running without any error, you can see blue light glowing on. If this LED is not glowing, there will be some problems. Disconnect the module and repeat the same process.
If everything is working fine, close the flash download tool, and command prompt.
Configuring ESP8266 as WiFi Deauther: DIY WiFi Jammer
On the first boot, it will offer a protected WiFi network with SSID: pwned, and password deauther. First, check in the Available WiFi connections pwned is there are not, If it is there, just connect to it by entering the password deauther, On Successful connection, Point your browser to “192.168.4.1”.
Select the WiFi that you want to attack, and go to the attacks tab from the top left corner. here you can see the different types of attacks.
For the demonstration purpose, I have connected my mobile to EI wifi that created only for this testing using the wifi router I have shown you at the beginning of the beginning of the article.
let’s see how deauther attack works. As soon as I started an attack, my mobile phone disconnected. and it is trying to reconnect. but it’s not able to connect. and also it is showing that the access point temporarily full. even if I try to connect manually it is not getting connected.
If I stop attacking, it is automatically connected. If I start attacking again, it got disconnected. because our esp8266 continuously attacking, and not letting wifi router to connect with others. if I stop attacking it is connected automatically. So, this is all about the deauther attack. this is how you can make wifi to disconnect from the all active connection.

let’s test the beacon attack. basically beacon attack used to confuse the user, in this attack we can create multiple SSIDs of either particular WiFi or Random random WiFi.
Start the beacon attack, and go to the SSIDs tab from the top left corner. Here Enter the SSID and number of SSIDs you wanted to create to confuse the user. Then click on the add button.
It will generate the same SSIDs. and then click on clone selected APs. as soon as you clone, you can see the same SSIDs on the mobile screen. So many WiFi Connections, with the same SSID. This is how you can confuse the user. 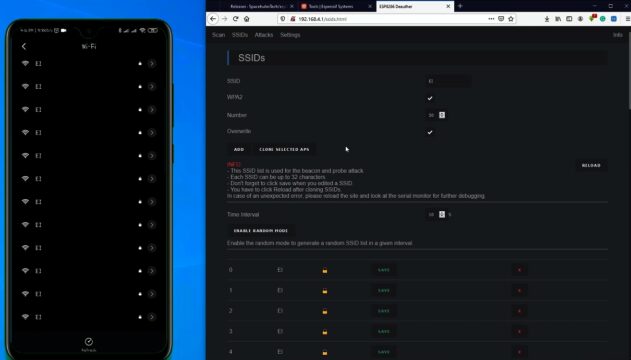
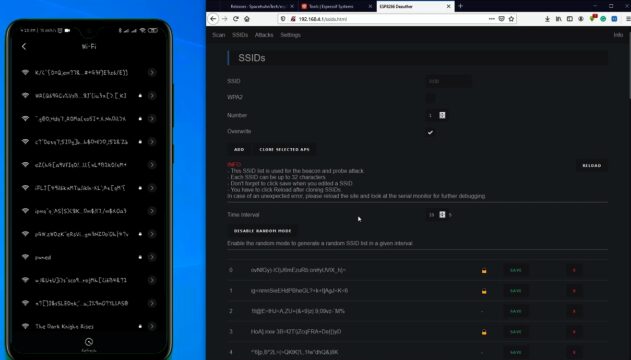
Click on the enable random mode, this will generate the SSIDs with Randon strings. Then click on the Clone selected APs. As soon as you start it, you can see the same on the mobile screen. If somebody sees this type of wifi connection sure they will get panic and stops using WiFi. once the testing is done, stop it.
On the settings tab, we have a bunch of configurations options for our esp8266. Like you can turn off wifi reset and reboot directly from here only. You can also change SSID, Password, and channel of the Deauther. And we have a lot more configurations. You can simply save all the changes by clicking on the save button at the end page.

Summary: DIY WiFi Jammer
That’s it for this tutorial, this is how we can hack any wifi network. but it is truly for educational purposes, Do not try this on public networks. I’m telling you again do not try this on public networks. because you will be responsible for the consequences
Greetings, on the recommended download https://github.com/martin-ger/esp_wifi_repeater. I see no deauther 2.1.0 1mb.bin”. Is this the correct download? Others seem to use the dearthur program from github.
Thank you in advance
Richard
DIY WiFi Jammer with NodeMCU ESP8266 is a unique way to create WiFi Jammer. Its really helpful information.