Table of Contents:
Introduction:
In this video, we will see an upgraded version of the previous project on AWS which is “v2.0 Temperature Data record on AWS IoT Core with ESP32 using Arduino IDE and MQTT Protocol”
In the previous videos, I have done this project by manually entering all AWS certificates to the sketch, In another video, I have uploaded the AWS Certificates to the SPIFFS, but before uploading, I have manually converted certificates from .pem format to .der format.
Due to this manual process, It’s difficult to deploy large no of devices. for example, If you want to deploy hundreds or thousands of IoT devices, this method is not suitable for that.
because it is a time-consuming process, and there are higher chances of human errors.
To make this process simpler, I have decided to eliminate both manual entering & converting process of the certificates.
PCBway:
This project is sponsored by PCBway.com, PCBWAY is one of the best PCB manufacturers in the current industry.
PCBway is offering services like PCB prototype, SMD Stencil, PCB assembly, Flexible PCBs & Advanced PCBs.
At PCBway.com we can get 10 pieces of 2 layered PCBs at just $5 with 24 hours build time.
The Best part of PCBway is the Instant quote feature, just enter the PCB size, choose the quantity, layers, and thickness. That’s it, we will get the instant quote. place an order by clicking on saving to cart.

This tutorial is also available in the video format, you can watch the below video or continue reading this article.
Requirements:
1. ESP32 Module (Buy on Amazon)
2. DHT11 or DHT22 sensor (Buy on Amazon)
3. I2C Oled Display (Buy on Amazon)
4. Breadboards (Buy on Amazon)
5. connecting wires (Buy on Amazon)
6. An active account on Amazon web services.

Steps involved in this Tutorial: AWS IoT Core with ESP32
- Setting up AWS Management Console
- Circuit Diagram & Connections
- Programming Part- which includes
3.1 Installing ESP32 Add-on, ESP32 Sketch data upload tool & Required Libraries
3.2 Modification of sketch according to AWS Thing
3.3 Explanation of Important blocks of code
3.4 Uploading AWS Certificates to ESP32 SPIFFS File System
3.5 Uploading Code to ESP32 Module - Testing and Demonstration of Data logging process
Setting up AWS Management Console
Check the following tutorial for step by step Explanation: How to create a thing in AWS IoT Core, its Certificates & policies
Setting up the AWS environment for these devices is pretty simple. check the following: Amazon AWS
and login to the AWS Management Console & search for IoT core in the Amazon Services, Find services search bar will help you in this regard. After getting into the IoT Core section, tap on the tab called “Manage” from the AWS IoT menu which is on the left side, tap on the register thing button if you haven’t added any devices till now. If you have previously added things just tap on the button named “Create” which is on the top right corner beside the iot-notifications Icon.
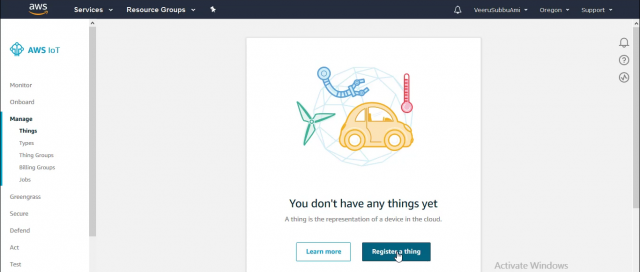 Picture: AWS IoT core Register Thing
Opt to create a single thing and Give your thing name, scroll down and tap on the Next button and then you are immediately offered the one-click certificate generation option. An individual X.509 certificate per device is the recommended way of interacting with AWS IoT services from devices, offering the ability to burn the private key into the device upon enrolment that is then never transferred across the internet alongside requests, a security win. Download the certificate and private key for each device, and also a root CA. Make sure to hit that activate button so the certificate can be used. finish the process by clicking on the “Done” button. If you need any assistance in this regard you can check the video tutorial.
 Picture: AWS IoT core Certificates download tab
Next point is to create and attach a policy to the certificate, authorizing the authenticated device to perform IoT actions on IoT resources. for this tap on the “secure” tab from the AWS IoT menu which is on the left side, later go for the policies section. Now tap on the button named “Create” which is on the top right corner beside the IoT-notifications Icon. give your policy name and fill the fields(Action, Resource ARN ) with a star “*” and check to Allow for Effect option then press the “create” button.
Now tap on the certificates section which is right above the policies section, You will see a certificate which you have created earlier, tap on the three dots and choose to attach the policy, a pop will come showing your existing policies, check on the recent policy that you have created and attached. That’s it you have successfully created a thing, generated a certificate and attached policy to it.
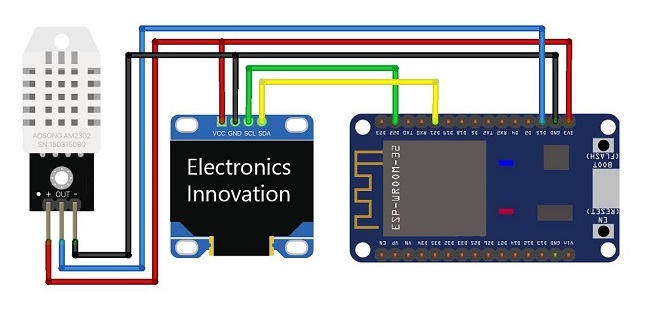
Circuit Diagram & Connections: AWS IoT Core with ESP32
Here Is the circuit diagram to interface OLED Display & DHT11 or 22 sensors with ESP32 Module. Connect the circuit as shown in the circuit diagram.
Source Code & Programming Part : AWS IoT Core with ESP32
We’ll program the ESP32 using Arduino IDE. So, we should have the esp32 addon installed in our Arduino Ide.
Installing ESP32 Add-on, ESP32 Sketch data upload tool & Required Libraries
In this example, we use the Arduino IDE to program the ESP32-Cam board. So, we need to have Arduino IDE installed as well as the ESP32 add-on. If you haven’t installed the ESP32 add-on in your machine, follow the below tutorials and get it installed.
Also, we should have the ESP32 sketch data upload tool installed in our Arduino IDE to upload the AWS certificates to the ESP32 SPIFFS File system. You can follow the below titorial to get this tool installed.
These are the libraries we are using, First 3 libraries are pre-installed. you don’t have to install them again.
we have to install the last 4 libraries, We can install them directly from the Arduino Library manager itself. Goto library manager, type name of the library which is “PubSubClient” and install it.
Repeat the same process for DHT, Adafruit GFX, and AdafruitSSD1306 libraries.
#include "SPIFFS.h"
#include <WiFiClientSecure.h>
#include <Wire.h>

#include <PubSubClient.h>
#include <DHT.h>  // library for getting data from DHT
#include <Adafruit_GFX.h>   //Libraries for OLED Display
#include <Adafruit_SSD1306.h>
Source Code: v2.0 Temperature Data record on AWS IoT Core with ESP32
Here Is the code for v2.0 Temperature Data record on AWS IoT Core with ESP32, Download the code from below Github link and open with Arduino IDE. but do not upload the code yet. we need to make some changes in the code to work for you.
GitHub Project link: https://github.com/VeeruSubbuAmi/v2.0-Temperature-Data-record-on-AWS-IoT-Core-with-ESP32
Modification of sketch according to AWS Thing
Network Credentials:
Insert your network credentials in the following lines:
// Enter your WiFi ssid and password
const char* ssid = "xxxxxxxxxxxxxxx"; //Provide your SSID
const char* password = "xxxxxxx"; // Provide Password
MQTT Server endpoint:
You can get this from AWS account itself, click on the thing that you have recently created, Click on interact, here you will find it. Copy and past it over here.
const char* mqtt_server = "xxxxxxxxxxxxxxxxxxxxxxxxxxxxxxxxxxxxxxxxxxxxxxxxxxx"; // Relace with your MQTT END point
Explanation of Important blocks of code:
Here is the one more important thing we should notice, If you are using DHT11 just keep it as DHT11, but I’m using DHT22 so, I will keep it as DHT22
#define DHTPIN 15         //pin where the DHT22 is connected
DHT dht(DHTPIN, DHT22);
Coming to the void setup,
Here, we are mounting the SPIFFS file system, also we are printing a status message for debugging purposes.
if (!SPIFFS.begin(true)) {
  Serial.println("An Error has occurred while mounting SPIFFS");
  return;
}
Then we are reading the file content to string from the SPIFFS File System, and printing them on the Serial monitor. Repeating same process for the other two files.
//=======================================
  //Root CA File Reading.
  File file2 = SPIFFS.open("/AmazonRootCA1.pem", "r");
  if (!file2) {
    Serial.println("Failed to open file for reading");
    return;
  }
  Serial.println("Root CA File Content:");
  while (file2.available()) {
    Read_rootca = file2.readString();
    Serial.println(Read_rootca);
  }
  //=============================================
  // Cert file reading
  File file4 = SPIFFS.open("/83e2fa1863-certificate.pem.crt", "r");
  if (!file4) {
    Serial.println("Failed to open file for reading");
    return;
  }
  Serial.println("Cert File Content:");
  while (file4.available()) {
    Read_cert = file4.readString();
    Serial.println(Read_cert);
  }
  //=================================================
  //Privatekey file reading
  File file6 = SPIFFS.open("/83e2fa1863-private.pem.key", "r");
  if (!file6) {
    Serial.println("Failed to open file for reading");
    return;
  }
  Serial.println("privateKey File Content:");
  while (file6.available()) {
    Read_privatekey = file6.readString();
    Serial.println(Read_privatekey);
  }
  //=====================================================
Then converting these strings to pointers, because the espClient will not accept them if they are in the string format.
char* pRead_rootca;
  pRead_rootca = (char *)malloc(sizeof(char) * (Read_rootca.length() + 1));
  strcpy(pRead_rootca, Read_rootca.c_str());

  char* pRead_cert;
  pRead_cert = (char *)malloc(sizeof(char) * (Read_cert.length() + 1));
  strcpy(pRead_cert, Read_cert.c_str());

  char* pRead_privatekey;
  pRead_privatekey = (char *)malloc(sizeof(char) * (Read_privatekey.length() + 1));
  strcpy(pRead_privatekey, Read_privatekey.c_str());
Then we are printing converted pointers on the serial monitor to compare with the original strings.
Serial.println("================================================================================================");
Serial.println("Certificates that passing to espClient Method");
Serial.println();
Serial.println("Root CA:");
Serial.write(pRead_rootca);
Serial.println("================================================================================================");
Serial.println();
Serial.println("Cert:");
Serial.write(pRead_cert);
Serial.println("================================================================================================");
Serial.println();
Serial.println("privateKey:");
Serial.write(pRead_privatekey);
Serial.println("================================================================================================");
Then passing these converted pointers to espclient. Then starting the server with MQTT END Point and port.
espClient.setCACert(pRead_rootca);
espClient.setCertificate(pRead_cert);
espClient.setPrivateKey(pRead_privatekey);

 client.setServer(mqtt_server, mqtt_port);
client.setCallback(callback);
Then we are reading the mac address of the ESP32 module. after that initialized Oled display with 12c address.
//====================================================================================================================
  WiFi.macAddress(mac);
  snprintf(mac_Id, sizeof(mac_Id), "%02x:%02x:%02x:%02x:%02x:%02x",
           mac[0], mac[1], mac[2], mac[3], mac[4], mac[5]);
  Serial.print(mac_Id);
  //=====================================================================================================================

  if (!display.begin(SSD1306_SWITCHCAPVCC, 0x3C)) { // Address 0x3D for 128x64
    Serial.println(F("SSD1306 allocation failed"));
    for (;;);
  }
  delay(2000);
  display.clearDisplay();
  display.setTextColor(WHITE);
Coming to the void loop,
Here we are reading the temperature and humidity readings from the DHT sensor. Then printing them on the Oled Display.
float h = dht.readHumidity();   // Reading Temperature form DHT sensor
  float t = dht.readTemperature();      // Reading Humidity form DHT sensor
  float tF = (t * 1.8) + 32;
  if (isnan(h) || isnan(t))
  {
    Serial.println("Failed to read from DHT sensor!");
    return;
  }
  //===============================================
  display.clearDisplay();
  // display temperature
  display.setTextSize(1);
  display.setCursor(0,7);
  display.print("Temperature: ");
  display.setTextSize(2);
  display.setCursor(0, 18);
  display.print(t);
  //  display.print(" ");
  display.setTextSize(1);
  display.cp437(true);
  display.write(167);
  display.setTextSize(2);
  display.print("C");

  // display humidity
  display.setTextSize(2);
  display.setCursor(0, 45);
  display.print(h);
  display.print("%");
  display.setTextSize(1);
  display.setCursor(74, 50);
  display.print(" ");
  display.print("Rel H");
  display.display();
Checking the client connection, if it is not connected, calling the reconnect function.
if (!client.connected()) {
  reconnect();
}
client.loop();
Converting all three variables mac_id, temperature, and humidity to the string format. Then again Converting them to the JSON format using this line. Then publishing the message to the MQTT topic ei_out. this publishing process will be repeated for every two seconds. Then blinking ESP32 onboard led on every successful hit to the AWS.
long now = millis();
  if (now - lastMsg > 2000) {
    lastMsg = now;
    //=============================================================================================
    String macIdStr = mac_Id;
    String Temprature = String(t);
    String Humidity = String(h);
    snprintf (msg, BUFFER_LEN, "{\"mac_Id\" : \"%s\", \"Temprature\" : %s, \"Humidity\" : \"%s\"}", macIdStr.c_str(), Temprature.c_str(), Humidity.c_str());
    Serial.print("Publish message: ");
    Serial.print(count);
    Serial.println(msg);
    client.publish("ei_out", msg);
    count = count + 1;
    //================================================================================================
  }
  digitalWrite(2, HIGH);   // turn the LED on (HIGH is the voltage level)
  delay(1000);                       // wait for a second
  digitalWrite(2, LOW);    // turn the LED off by making the voltage LOW
  delay(1000);                       // wait for a second
}
Uploading AWS Certificates to ESP32 SPIFFS File System:
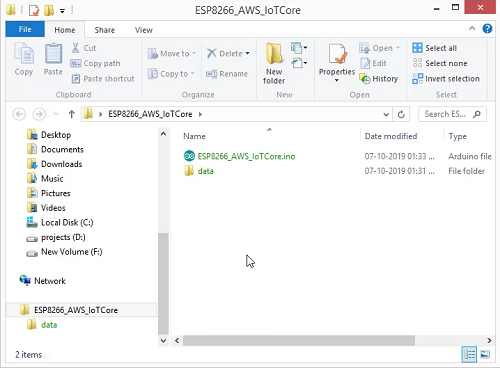
Before uploading this code we have to upload the certificates to the ESP32 SPIFFS file system.
For that, the certificates should be copied to the folder called data which should sit along with the code as shown here.
As you can see here, the certificates are in their original .pem format and we didn’t convert them to any other format like my previous project. we will directly upload these certificates to the file system without any change.
Now come back to the Arduino IDE and Connect the ESP32 module with Laptop.
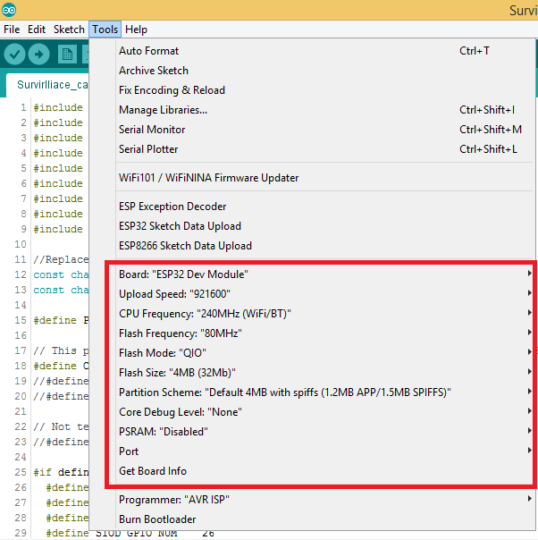
Check the Uploading configurations like board: ESP32 Wroover Module, Uploading Speed, partition scheme should be default 4mb with spiffs because we are using the spiffs file system of ESP32. then select the right port.
If everything is okay go to the tools and click on the ESP32 Sketch data upload tool.
Uploading Code to ESP32 Module:
After successful uploading of the certificates, Check the Uploading configurations like board: ESP32 DEV Module, Uploading Speed, partition scheme should be default 4mb with spiffs because we are using the spiffs file system of ESP32. then select the right port.
If everything is okay, upload the code.
Testing and Demonstration of Data logging process: AWS IoT Core with ESP32
On the Serial monitor, we can see our ESP32 successfully connected to the programmed wifi and allocated with IP address. then it reads AWS certificates from the SPIFFIs and printed over here.
Then it also printed the certificates in pointers format which are passing to the esp client. Then read the mac id of esp32 and printed over here. Then initiated the MQTT connection with the AWS cloud and connected to it. Now it started publishing JSON data to the MQTT topic ei_out. We can also see the temperature and humidity data on the OLED Display.
Now we can see the same data on the AWS, by subscribing to the topic ei_out. yeah, it’s here. The temperature and humidity data along with mac_id can found be found here.
As you can here I have received a lot of data points seamlessly without any error.
Now I will try to increase the temperature at the sensor with gas lighter. You can see the increment in Temperature and decrement in the Humidity. because temperature and humidity are inversely proportional to each other.
We can see the same data on the 3 different mediums like OLED Display, AWS, and Serial monitor because all are synchronized with each other..
Once the testing is done, Close all the connections before you leave. otherwise, you will end up charged by the AWS.

Summary: AWS IoT Core with ESP32
So, That’s it for this tutorial, This is how we can post temperature and humidity data to the AWS without any manual entering & converting process of the certificates.
I hope this video will help you in deploying the large no of IoT Devices.
If you feel the same, or if you have done such large deployment projects using this tutorial, let me know in the comments section, because that will give me more boost to work hard and help you with IoT.
See you soon on the next interesting project bubyeee…
[…] article is a continuation of the previous project, v2.0 of Temperature and Humidity data record on AWS IoT Core with ESP32 using Arduino IDE and MQTT P… if you didn’t read that article, please go and read that article from the above link, then come […]
Great job !
Awesome, i get all working with this Tutorial, thanks you from argentina, if you can make more projects with AWS. ( LIke GrennGrass or FleetHub)
You inspired me to make a IoT projects in Argentina!
It doesn’t work. Could you help out there?
fatal error: SPIFFS.h: No such file or directory
#include “SPIFFS.h”
^~~~~~~~~~
compilation terminated.
exit status 1
SPIFFS.h: No such file or directory
Install the library.
thanks for you rapid respond. I have reinstall Windows 10 and Arduino 1.8.15 and Esp32 board lab. However, this time
\In function ‘void setup()’:
test_esp_alexa:105:1: error: ‘espClient’ was not declared in this scope
espClient.setCACert(pRead_rootca);
The espClient looks like your private variable, but I did not see you define it.
Here client.setServer(mqtt_server, mqtt_port); What is the mqtt_port?