Table of Contents:
Introduction:
Programing the Espressif ESP32 module to communicate with Ubidots over MQTT using Visual Studio Code and MicroPython. First, we will set up the ESP32-DevkitC board with micropython using ESP-IDF. then we will install Visual Studio Code and other necessary installation packages like nodeJs. also, we will install pymakr plugin/extension in Visual Studio Code, The Pymakr plugin makes everything much simpler when programming with micropython. Finally, we will write a script to Connect your ESP32 to Ubidots over MQTT using MicroPython. Then will demonstrate the same.
This article is brought to you by pcbway.com,
PCBWay:
PCBWay is one of the best PCB manufacturers in the current industry.
PCBWay is offering services like PCB prototype, SMD Stencil, PCB assembly, Flexible PCBs & Advanced PCBs.
At PCBWay.com we can get 10 pieces of 2 layered PCBs at just $5 with 24 hours build time.
The Best part of PCBWay is the Instant quote feature, just enter the PCB size, choose the quantity, layers, and thickness. That’s it, we will get the instant quote. place an order by clicking on saving to cart.

Now, let’s dive into the episode.
Video Tutorial: Connect ESP32 to Ubidots using Micropython
This tutorial is also available in video format, you can watch the below videos or continue reading this article.
Hardware Requirements:
Software Requirements :
- ESP-IDF Powershell
- Visual Studio Code with Pymakr Extention
- Active Ubidots Account
ESP32:
The ESP32 module is a low cost (less than $15), low power microcontroller with integrated Wi-Fi & dual-mode Bluetooth. The ESP32 series employs a Tensilica Xtensa LX6 microprocessor in both dual-core and single-core variations. The ESP32 was created and developed by Espressif Systems, a Shanghai-based company with a proven record of quality microcontroller production and distribution.
A micro USB cable is used to connect the ESP32 module with the Desktop/Laptop. A breadboard is used to place the ESP32 for further connections.

Visual Studio with pymakr plugin:
Visual Studio Code is a lightweight but powerful source code editor which runs on your desktop and is available for Windows, macOS, and Linux. It comes with built-in support for JavaScript, TypeScript, and Node.js and has a rich ecosystem of extensions for other languages (such as C++, C#, Java, Python, PHP, Go) and runtimes (such as .NET and Unity). Begin your journey with VS Code with these introductory videos.
Pymakr is a plugin developed by Pycom, that works wells with popular text editor Visual Studio. The Pymakr plugin makes everything much simpler when programming with micropython.
Ubidots Cloud Platform:
Ubidots is an IoT Platform empowering innovators and industries to prototype and scale IoT projects to production. Use the Ubidots platform to send data to the cloud from any Internet-enabled device. You can then configure actions and alerts based on your real-time data and unlock the value of your data through visual tools. Ubidots offers a REST API that allows you to read and write data to the resources available: data sources, variables, values, events, and insights. The API supports both MQTT and HTTPS and an API Key is required. Here we will use MQTT protocol to communicate with ubidots.
Steps to Connect ESP32 to Ubidots using Micropython:
- Setting up ESP32-DevkitC board
- Installing Visual Studio Code with Pymakr plugin
- Coding and Uploading program to the ESP32
- Demonstration
Setting up ESP32-DevkitC board
To set up ESP32 to program with micropython, first, we have to install ESP-IDF on our computer.
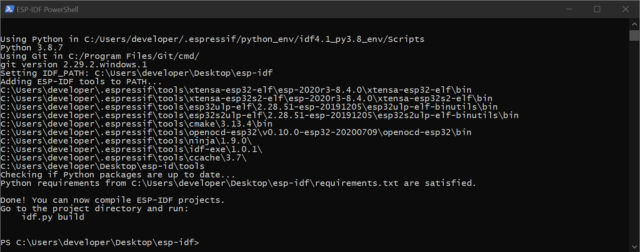
The easiest way to install ESP-IDF’s prerequisites is to download one of ESP-IDF Tools Installers from this URL: https://dl.espressif.com/dl/esp-idf/?idf=4.4
Download and install the ESP-IDF Installer, then Run ESP-IDF PowerShell Environment. After that ESP-IDF PowerShell will open as shown here.
Next, flash the firmware of the ESP32,
Download the latest firmware for the ESP32 module to your PC, and upload the firmware to the ESP32 using the below commands.
If you are putting MicroPython on your board for the first time then you should first erase the entire flash using:
esptool.py --chip esp32 erase_flash
From then on program the firmware starting at address 0x1000:
esptool.py --chip esp32 write_flash -z 0x1000 esp32-xxxxxxxx-unstable-v1.15-xx-xxxxxxxxxx.bin
Note: The firmware file should be kept inside the “/esp-idf/” Directory. or you have to redirect to the file location on Powershell.
Now, The ESP32 successfully set up with the Micropython prerequisites. Now. It’s time to write code in micropyton to post data to the ubidots platform and then program the ESP32 module.
Before that, we need an Integrated Development Environment to do that. Let’s set up that now.
Visual Studio combined with the Pymaker plugin will get the job done for us.
Installing Visual Studio Code with Pymakr plugin:
Pycom supports Microsoft’s Visual Studio Code IDE platform with the Pymakr Plugin. So, we can install Visual Studio Code and Add a Pymakr extention.
- First, download and install Visual Studio Code.
- You will also need NodeJS installed on your PC. Please download the latest LTS version available from the NodeJS website.
- After Successful installation of both packages, open VSCode.

- Navigate to the Extensions page, using the 5th button in the left navigation

- Search for Pymakrand click the install button next to it.

- Within a few minutes, a reload button should appear. Press it to reload VSCode.

- That’s it! You’ve installed the Pymakr Extension for VSCode

Coding and Uploading program to the ESP32
Create a New folder named ESP32_Ubidots and save it on the desktop. Now go to VSCode and Open the same folder from the file menu.
To begin, create a new directory called “ESP32_Ubidots” to manage the codes and libraries. Once the directory is created go to VSCode and, select Open folder from the file menu., and search for the directory “ESP32_Ubidots,” (just created), and open it.
MQTT Library Setup:
As we are using MQTT protocol as the communication medium between esp32 and ubidots cloud, we should set up the MQTT libraries.
To publish data over MQTT, install the libraries umqtt.robust and umqtt.simple.
First, we are going to add folders to hold the libraries. Right-click on the folder “ESP32_Ubidots” and select “New folder”, and assign “lib” as the name.
Next, we have to add the library “umqtt” into the “lib” folder. Right-click on the folder “lib” and select “New Folder” and assign it the name: “umqtt”.
Then, click on the folder “umqtt” and select “New File”, assigning the name “simple.py”. Copy the code from the Micropython “simple.py” repository and paste it into “simple.py” file. Next, repeat these instructions but with “robust.py” as the file name and paste this “robust.py” Micropython library into the file. then save simple.py and robust.py code files when finished.
Code Setup to Connect ESP32 to Ubidots using Micropython
Click on the folder “ESP32_Ubidots” and select “New File”, assign “boot.py” as the file name. then copy & paste the below code into the “boot.py” file and save it.
Make sure you replace (“SSID”, “PASSWORD”) with newly available wifi credentials.
import time

import network

import machine as m

sta_if = network.WLAN(network.STA_IF); sta_if.active(True)

sta_if.scan() # Scan for available access points

sta_if.connect("SSID", "PASSWORD") # Connect to an AP

sta_if.isconnected()

time.sleep(3)
Then again, Click on the folder “ESP32_Ubidots” and select “New File”, assign “main.py” as the file name. then copy & paste the below code into the “main.py” file and save it.
The below code will create the functions to check the Internet connection, publish data, and upload the data to Ubidots. In this step, it is necessary to obtain your private Ubidots TOKEN and replace your token with your unique Ubidots TOKEN in the code (be sure to leave the quotation marks).
from umqtt.robust import MQTTClient

import machine as m

ubidotsToken = “YOUR-UBIDOTS-TOKEN-HERE”

clientID = “RANDOM-ALPHA-NUMERIC-NAME_OR_IMEI DEVICE ID”

client = MQTTClient("clientID", "industrial.api.ubidots.com", 1883, user = ubidotsToken, password = ubidotsToken)

def checkwifi():

    while not sta_if.isconnected():

        time.sleep_ms(500)

        print(".")

        sta_if.connect()

pin13 = m.Pin(13, m.Pin.IN, m.Pin.PULL_UP)

def publish():

    while True:

        checkwifi()

        client.connect()

        lat = 6.2

        lng = -75.56

        var = repr(pin13.value())

        msg = b'{"location": {"value":%s, "context":{"lat":%s, "lng":%s}}}' % (var, lat, lng)

        print(msg)

        client.publish(b"/v1.6/devices/ESP32_EI", msg)

        time.sleep(20)

publish()
Confirm all codes have been saved properly;
Uploading code to Connect ESP32 to Ubidots using Micropython
Now Connect the ESP32 module to the computer with the help of a micro-USB cable and make sure the Pymakr plugin activated.
On the terminal, you will see.
Searching for PyCom boards on serial…
Connecting to COM3…
>>>
Then click the upload button,
Once the whole project has been uploaded to the ESP32, the module will automatically get reset and run automatically.
Then you can see the log on the Pymakr terminal stating that the data is being sent to the Ubidots.
Demonstration:
Go to your Ubidots account, then check in the devices section. You will see a newly created device named “ESP32_EI”.
If you go into that, you can see the example data that we have just sent as shown here.
Now you can simply do this project: DIY Intelligent Pulse Oximeter for Covid Patients
Video Tutorial: Connect ESP32 to Ubidots using Micropython
This tutorial is also available in video format, you can watch the below videos or continue reading this article.