Table of Contents:
Introduction:
In this video, we are going to see how to make ESP32-Cam Remote Controlled Car or ESP32 Cam Surveillance Car, and how we can control it from a mobile phone over WiFi.
PCBway:
This project is sponsored by PCBway.com, PCBWAY is one of the best PCB manufacturers in the current industry.
PCBway is offering services like PCB prototype, SMD Stencil, PCB assembly, Flexible PCBs & Advanced PCBs.
At PCBway.com we can get 10 pieces of 2 layered PCBs at just $5 with 24 hours build time.
The Best part of PCBway is the Instant quote feature, just enter the PCB size, choose the quantity, layers, and thickness. That’s it, we will get the instant quote. place an order by clicking on saving to cart.

This tutorial is also available in the video format, you can watch the below video or continue reading this article.
Required components:
- RC Car (Buy Online)
- ESP32 Camera (Buy Online)
- L293D Motor Driver (Buy Online)
- Portable Powersupply (Buy Online)
- FTDI Programmer Module (Buy Online)
- Connecting wires (Buy Online)
Introduction to ESP32-Cam:
The ESP32-Cam is a very small camera module with the ESP32-S chip that costs less than $10. Besides the OV2640 camera and several GPIOs to connect peripherals, it also features a microSD card slot that can be useful to store images taken with the camera or to store files to serve to clients.

ESP32-Cam Components/parts:

The ESP32-Cam doesn’t have any onboard USB connector like NodeMCU-ESP8266 comes with an onboard micro-USB connector, so you need an FTDI programmer to upload code through the U0R and U0T pins (serial pins).

Feature of ESP32 Camera:
Here is a list with the ESP32-Cam features:
- The smallest 802.11b/g/n Wi-Fi BT SoC module
- Low power 32-bit CPU, can also serve the application processor
- Up to 160MHz clock speed, summary computing power up to 600 DMIPS
- Built-in 520 KB SRAM, external 4MPSRAM
- Supports UART/SPI/I2C/PWM/ADC/DAC
- Support OV2640 and OV7670 cameras, built-in flash lamp
- Supports image WiFI upload
- Support TF card
- Supports multiple sleep modes
- Embedded Lwip and FreeRTOS
- Supports STA/AP/STA+AP operation mode
- Support Smart Config/AirKiss technology
- Support for serial port local and remote firmware upgrades (FOTA)
ESP32-Cam Pinout(AI-Thinker module):

There are three GND pins and two pins for power: either 3.3V or 5V.
GPIO 1 and GPIO 3 are the serial pins. You need these pins to upload code to your board. Additionally, GPIO 0 also plays an important role, since it determines whether the ESP32 is in flashing mode or not. When GPIO 0 is connected to GND, the ESP32 is in flashing mode.
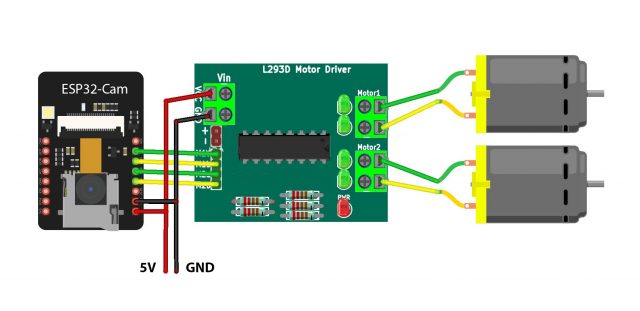
Circuit Diagram: ESP32 Cam Remote Controlled Car
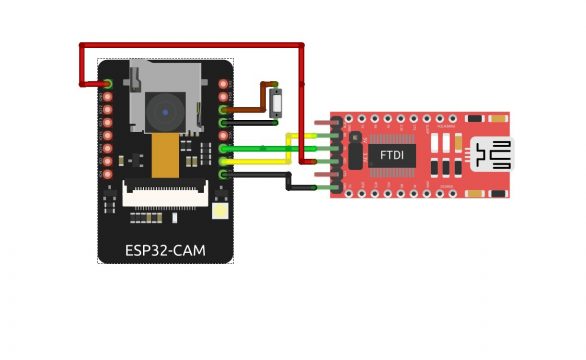
Circuit Diagram: ESP32-Cam Programming
Installing ESP32 Add-on, Programming part.
We’ll program the ESP32 using Arduino IDE. So, we should have the esp32 addon installed in our Arduino Ide.
1. ESP32 add-on Arduino IDE.
In this example, we use the Arduino IDE to program the ESP32-Cam board. So, we need to have Arduino IDE installed as well as the ESP32 add-on. If you haven’t installed the ESP32 add-on in your machine, follow the below tutorials and get it installed.
2. Source Code: ESP32 Cam Remote Controlled Car
Download the code from below Git hub link. but don’t upload it yet. we need to make some changes to make it work. we need to select the right camera Module & insert network credentials
https://github.com/VeeruSubbuAmi/ESP32_Cam_WiFi_Controlled_Car
Select Camera Module:
We have to select the right camera module here, in my case it is an AI thinker Module. So I have uncommented specific one and commented the rest of the modules.
// Select camera model
//#define CAMERA_MODEL_WROVER_KIT
//#define CAMERA_MODEL_M5STACK_PSRAM
#define CAMERA_MODEL_AI_THINKER
Network Credentials
Insert your network credentials in the following lines:
const char* ssid = "XXXXXXXXXXXXXXX";
const char* password = "XXXXXX";
4. Uploading Source Code:
Connect ESP32-Cam with Computer with help of FTDI Module & data cable as shown in the below picture.
Note: Make sure you have connected IO0 and GND pins to put the ESP32-Cam module in Flash/ Boot mode.
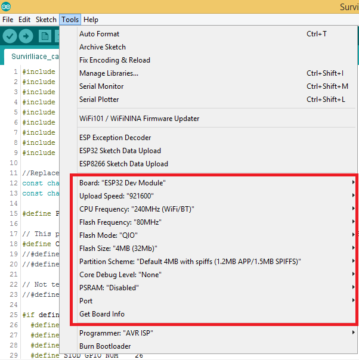
Check the Uploading credentials like board: ESP32 Dev Module, Uploading Speed, and select the right port. If everything okay, upload it.
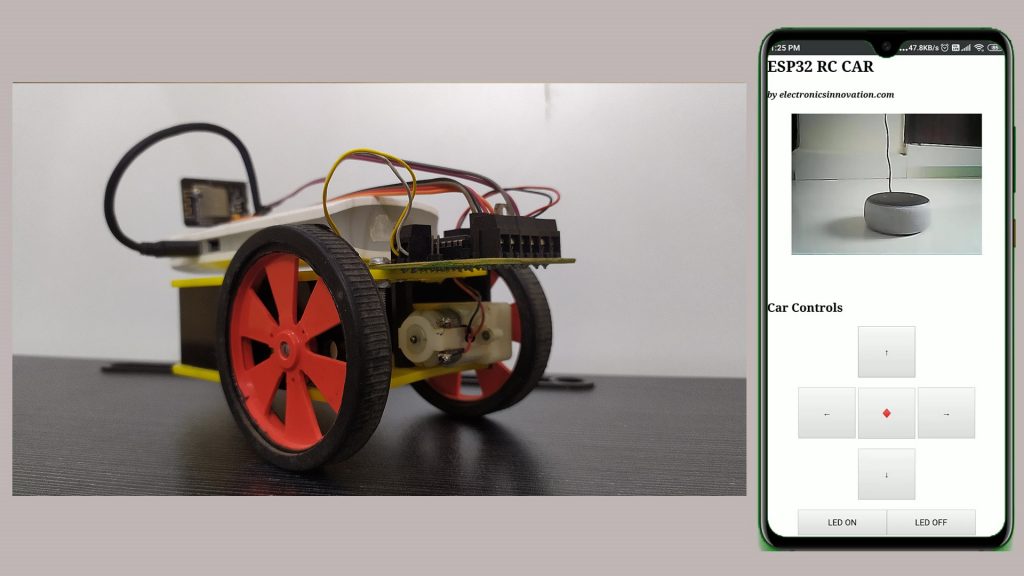
Testing & Demonstration: ESP32 Cam Remote Controlled Car
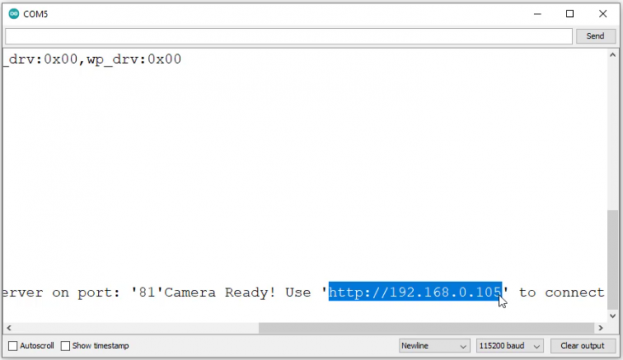
After successful uploading open serial monitor, disconnect IO0 and GND Pins & restart the module.
On the Serial monitor, you can see our ESP32 successfully connected to the programmed wifi and started webserver with this IP, remember this IP.
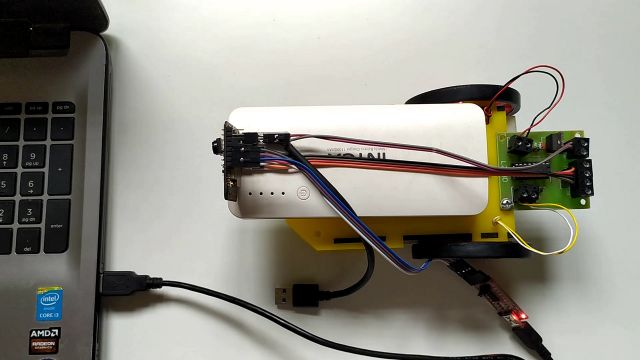
Now Disconnect the FTDI Programming Module, and Connect ESP32 with 5v Power supply. Then restart the module.
Open the favorite browser on either computer or mobile and enter the IP Address. Then this webpage will appear. On this webpage, we can watch the live streaming of ESP32-Camera, and we can Control our RC Car from the below Controlling buttons. We can also turn on and off ESP32-Cam Onboard Led, whenever we want.

So, Its time to turn as a kid and play with this Remote Control Car.
Very helpful, for beginners like me.
I appreciate all your work.
Thanks’.
how i can use this with motorshield l293d? thanks!!!!