Table of Contents:
Introduction:
Hey Guys Wellcome back to electronics Innovation.com, let’s jump into “Email alert based on temperature threshold with ESP32”.
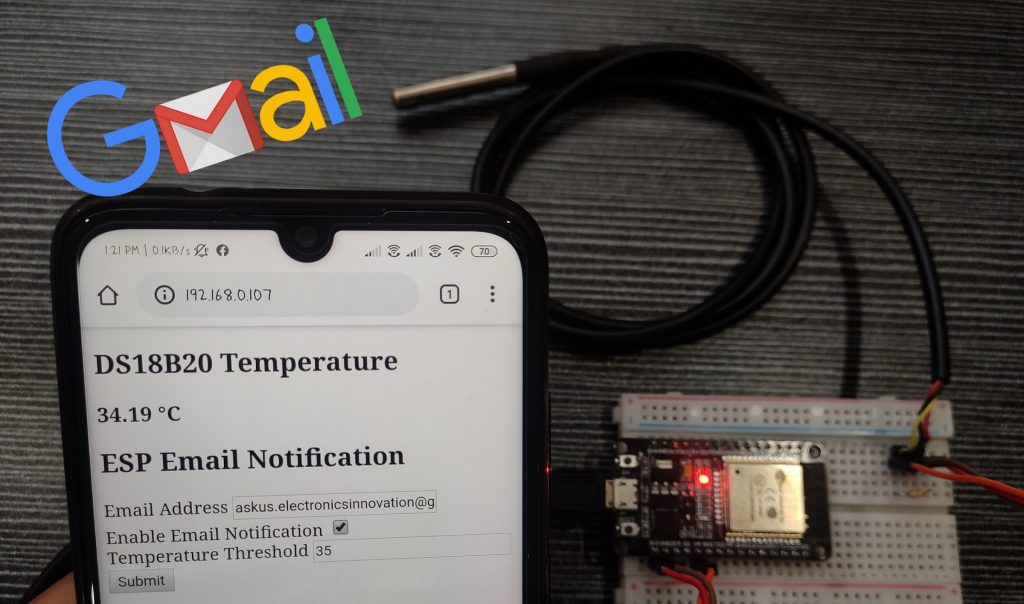
In this video, we are going to see How to send an Email Alert based Temperature threshold with ESP32 and update both recipient email address, temperature threshold wirelessly. If the temperature is above or below the Threshold, This ESP32 will send an alert Email to the programmed recipient email as Shown here, So without wasting time, let’s get started.
You can watch the following video or continue to the reading of the below-written article
Required Components:
Overview:
1.Getting Gmail account ready.
2. Installing the required libraries and Programming part.
3. Circuit Diagram & Connections on Breadboard.
4. Testing/ Debugging
Getting Gmail account ready.
I recommend creating a new email account to send the emails to your recipient address. Do not use your official one to send emails via ESP32. If some malfunction happened or something goes wrong in your code or if by mistake you make too many requests, your account can be banned or your account has temporarily disabled.
Here we will use a newly created Gmail account to send the emails, but you can use any other email provider. For the recipient mail, you can use your official one; there ill be no issue.
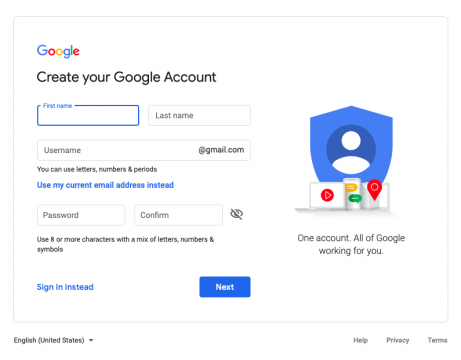
Open your favorite browser and Create a new email account for sending emails with the ESP32 by filling all the required details, as shown here. You can create a new mail from here.
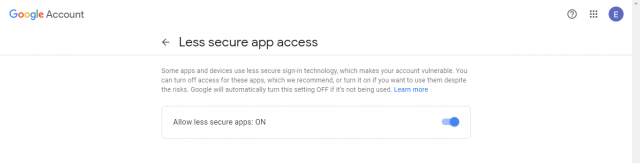
Log in to the Gmail account and Allow less secure apps from the security tab to get access to this new Gmail account, as shown here. Allow less secure apps here.
Google will send a security alert for this, Don’t panic. Ignore that mail.
Installing the required libraries and Programming part.
We will use the ESP32 MailClient library to Send the Emails, and ESPAsyncWebServer, AsyncTCP libraries to build an asynchronous web server. We’ll program the ESP32 using Arduino IDE.
1. ESP32 add-on Arduino IDE
We’ll program the ESP32 using Arduino IDE. So, Make sure that you have ESP32 add-on installed on your Arduino-IDE. if you don’t have it. Just follow the below tutorial to install it.
2. ESP32 Mail Client Library, DS18B20 Libraries (OneWire, Dallas Temperature)
To send emails with the ESP32, we’ll use the ESP32 Mail Client library OneWire & Dallas Temperature to read the data from the DS18B20 temperature sensor. Follow the below instruction to install the library.
In your Arduino IDE go to Sketch > Include Library > Manage Libraries…
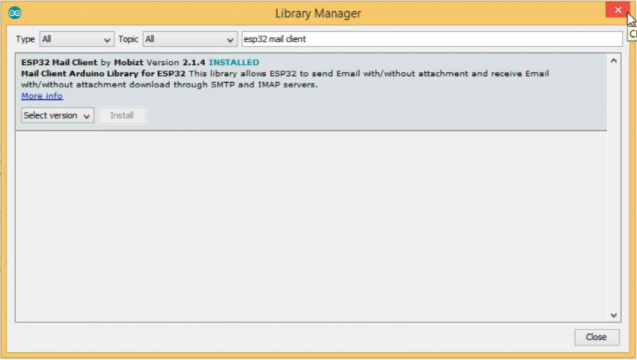
The Library Manager will open. Search for ESP32 Mail Client by Mobizt and install the library as shown here.
Repeat the same installing process for the other libraries by searching OneWire & Dallas Temperature.
3. ESPAsyncWebServer, AsyncTCP, DSI8B20 libraries (OneWire, Dallas Temperature)
Coming to these two libraries ” ESPAsyncWebServer, AsyncTCP“, these aren’t available to install through the Arduino Library Manager, so you need to add them manually by downloading from the GitHub.
Visit the GitHub page using links mentioned above & Download the zip files as shown here and save them in the known directory(Desktop/ Downloads).
To Install the libraries Go to the following directory “Sketch > Include Library > Add .zip Library“and click on the Add .zip Library and select the libraries you’ve just downloaded. After adding libraries, a status message will show.
Source Code: Email alert based on temperature threshold with ESP32
Copy the below code to your Arduino IDE, and save it. but don’t upload it yet. You need to make some changes to make it work for you. You need to insert the sender’s email address, the recipient’s email address, your default threshold input, and your network credentials.
Code Credits: Rui Santos
#include <WiFi.h>
#include <AsyncTCP.h>
#include <ESPAsyncWebServer.h>
#include <OneWire.h>
#include <DallasTemperature.h>
#include "ESP32_MailClient.h"
// REPLACE WITH YOUR AVAILABLE WIFI NETWORK CREDENTIALS
const char* ssid = "XXXXXXXXXX";//SSID of Wifi network
const char* password = "XXXXXXXXXX";// Password of wifi network
// To send Email using Gmail use port 465 (SSL) and SMTP Server smtp.gmail.com
// YOU MUST ENABLE less secure app option https://myaccount.google.com/lesssecureapps?pli=1
#define emailSenderAccount "XXXXXXXXXXXX"// Sender email address
#define emailSenderPassword "XXXXXXXXXXXX" // Sender email password
#define smtpServer      "smtp.gmail.com"
#define smtpServerPort  465
#define emailSubject "[ALERT] ESP32 Temperature" // Email subject
// Default Recipient Email Address
String inputMessage = "askus.electronicsinnovation@gmail.com"; //Reciepent email alert.
String enableEmailChecked = "checked";
String inputMessage2 = "true";
// Default Threshold Temperature Value
String inputMessage3 = "25.0";// Default temperature
String lastTemperature;
// HTML web page to handle 3 input fields (email_input, enable_email_input, threshold_input)
const char index_html[] PROGMEM = R"rawliteral(
<!DOCTYPE HTML><html><head>
<title>Email Notification with Temperature</title>
<meta name="viewport" content="width=device-width, initial-scale=1">
</head><body>
<h2>DS18B20 Temperature</h2>
<h3>%TEMPERATURE% °C</h3>
<h2>ESP Email Notification</h2>
<form action="/get">
Email Address <input type="email" name="email_input" value="%EMAIL_INPUT%" required><br>
Enable Email Notification <input type="checkbox" name="enable_email_input" value="true" %ENABLE_EMAIL%><br>
Temperature Threshold <input type="number" step="0.1" name="threshold_input" value="%THRESHOLD%" required><br>
<input type="submit" value="Submit">
</form>
</body></html>)rawliteral";
void notFound(AsyncWebServerRequest *request) {
request->send(404, "text/plain", "Not found");
}
AsyncWebServer server(80);
// Replaces placeholder with DS18B20 values
String processor(const String& var){
//Serial.println(var);
if(var == "TEMPERATURE"){
return lastTemperature;
}
else if(var == "EMAIL_INPUT"){
return inputMessage;
}
else if(var == "ENABLE_EMAIL"){
return enableEmailChecked;
}
else if(var == "THRESHOLD"){
return inputMessage3;
}
return String();
}
// Flag variable to keep track if email notification was sent or not
bool emailSent = false;
const char* PARAM_INPUT_1 = "email_input";
const char* PARAM_INPUT_2 = "enable_email_input";
const char* PARAM_INPUT_3 = "threshold_input";
// Interval between sensor readings.
unsigned long previousMillis = 0;
const long interval = 5000;
// GPIO where the DS18B20 is connected to
const int oneWireBus = 4;
// Setup a oneWire instance to communicate with any OneWire devices
OneWire oneWire(oneWireBus);
// Pass our oneWire reference to Dallas Temperature sensor
DallasTemperature sensors(&oneWire);
// The Email Sending data object contains config and data to send
SMTPData smtpData;
void setup() {
Serial.begin(115200);
WiFi.mode(WIFI_STA);
WiFi.begin(ssid, password);
if (WiFi.waitForConnectResult() != WL_CONNECTED) {
Serial.println("WiFi Failed!");
return;
}
Serial.println();
Serial.print("ESP IP Address: http://");
Serial.println(WiFi.localIP());
// Start the DS18B20 sensor
sensors.begin();
// Send web page to client
server.on("/", HTTP_GET, [](AsyncWebServerRequest *request){
request->send_P(200, "text/html", index_html, processor);
});
// Receive an HTTP GET request at <ESP_IP>/get?email_input=<inputMessage>&enable_email_input=<inputMessage2>&threshold_input=<inputMessage3>
server.on("/get", HTTP_GET, [] (AsyncWebServerRequest *request) {
// GET email_input value on <ESP_IP>/get?email_input=<inputMessage>
if (request->hasParam(PARAM_INPUT_1)) {
inputMessage = request->getParam(PARAM_INPUT_1)->value();
// GET enable_email_input value on <ESP_IP>/get?enable_email_input=<inputMessage2>
if (request->hasParam(PARAM_INPUT_2)) {
inputMessage2 = request->getParam(PARAM_INPUT_2)->value();
enableEmailChecked = "checked";
}
else {
inputMessage2 = "false";
enableEmailChecked = "";
}
// GET threshold_input value on <ESP_IP>/get?threshold_input=<inputMessage3>
if (request->hasParam(PARAM_INPUT_3)) {
inputMessage3 = request->getParam(PARAM_INPUT_3)->value();
}
}
else {
inputMessage = "No message sent";
}
Serial.println(inputMessage);
Serial.println(inputMessage2);
Serial.println(inputMessage3);
request->send(200, "text/html", "HTTP GET request sent to your ESP.<br><a href=\"/\">Return to Home Page</a>");
});
server.onNotFound(notFound);
server.begin();
}
void loop() {
unsigned long currentMillis = millis();
if (currentMillis - previousMillis >= interval) {
previousMillis = currentMillis;
sensors.requestTemperatures();
// Temperature in Celsius degrees
float temperature = sensors.getTempCByIndex(0);
Serial.print(temperature);
Serial.println(" *C");
// Temperature in Fahrenheit degrees
/*float temperature = sensors.getTempFByIndex(0);
SerialMon.print(temperature);
SerialMon.println(" *F");*/
lastTemperature = String(temperature);
// Check if temperature is above threshold and if it needs to send the Email alert
if(temperature > inputMessage3.toFloat() && inputMessage2 == "true" && !emailSent){
String emailMessage = String("Temperature above threshold. Current temperature: ") +
String(temperature) + String("C");
if(sendEmailNotification(emailMessage)) {
Serial.println(emailMessage);
emailSent = true;
}
else {
Serial.println("Email failed to send");
}
}
// Check if temperature is below threshold and if it needs to send the Email alert
else if((temperature < inputMessage3.toFloat()) && inputMessage2 == "true" && emailSent) {
String emailMessage = String("Temperature below threshold. Current temperature: ") +
String(temperature) + String(" C");
if(sendEmailNotification(emailMessage)) {
Serial.println(emailMessage);
emailSent = false;
}
else {
Serial.println("Email failed to send");
}
}
}
}
bool sendEmailNotification(String emailMessage){
// Set the SMTP Server Email host, port, account and password
smtpData.setLogin(smtpServer, smtpServerPort, emailSenderAccount, emailSenderPassword);
// For library version 1.2.0 and later which STARTTLS protocol was supported,the STARTTLS will be
// enabled automatically when port 587 was used, or enable it manually using setSTARTTLS function.
//smtpData.setSTARTTLS(true);
// Set the sender name and Email
smtpData.setSender("ESP32_ElectronicsInnovation", emailSenderAccount);
// Set Email priority or importance High, Normal, Low or 1 to 5 (1 is highest)
smtpData.setPriority("High");
// Set the subject
smtpData.setSubject(emailSubject);
// Set the message with HTML format
smtpData.setMessage(emailMessage, true);
// Add recipients
smtpData.addRecipient(inputMessage);
smtpData.setSendCallback(sendCallback);
// Start sending Email, can be set callback function to track the status
if (!MailClient.sendMail(smtpData)) {
Serial.println("Error sending Email, " + MailClient.smtpErrorReason());
return false;
}
// Clear all data from Email object to free memory
smtpData.empty();
return true;
}
// Callback function to get the Email sending status
void sendCallback(SendStatus msg) {
// Print the current status
Serial.println(msg.info());
// Do something when complete
if (msg.success()) {
Serial.println("----------------");
}
}
The following should change before you upload the code:
Network Credentials
Insert your network credentials in the following lines:
// REPLACE WITH YOUR NETWORK CREDENTIALSconst char* ssid = "REPLACE_WITH_YOUR_SSID"; const char* password = "REPLACE_WITH_YOUR_PASSWORD";
Email Settings
Insert the sender email – this is the email that will be used to send emails by the ESP32.
#define emailSenderAccount "example_sender_account@gmail.com"Type the email sender password:
#define emailSenderPassword "email_sender_password"In the next lines, insert the email sender SMTP server settings. We’re using a Gmail account. If you’re using another email provider you need to insert the right server settings.
#define smtpServer "smtp.gmail.com"
#define smtpServerPort 465Insert the email subject on the following line:
#define emailSubject "[ALERT] ESP32 Temperature"SMTP Server Settings
Here we will SMTP server, So you have to use the appropriate SMTP Server settings of the sender email.
Gmail SMTP Server Settings
If you’re using a Gmail account, these are the SMTP Server details:
- SMTP Server: smtp.gmail.com
- SMTP username: Complete Gmail address
- SMTP password: Your Gmail password
- SMTP port (TLS): 587
- SMTP port (SSL): 465
- SMTP TLS/SSL required: yes
Outlook SMTP Server Settings
For Outlook accounts, these are the SMTP Server settings:
- SMTP Server: smtp.office365.com
- SMTP Username: Complete Outlook email address
- SMTP Password: Your Outlook password
- SMTP Port: 587
- SMTP TLS/SSL Required: Yes
Live or Hotmail SMTP Server Settings
For Live or Hotmail accounts, these are the SMTP Server settings:
- SMTP Server: smtp.live.com
- SMTP Username: Complete Live/Hotmail email address
- SMTP Password: Your Windows Live Hotmail password
- SMTP Port: 587
- SMTP TLS/SSL Required: Yes
If you’re using another email provider, you need to search for its SMTP Server settings.
Default Reciepent Email & Temperature threshold.
Next, we have some auxiliary variables to save the values submitted through the form/enter default. The input message variable holds the recipient’s email. You can insert the default’s recipient’s email. You can change the recipient’s email later on the form.
String inputMessage = "your_email_recipient@gmail.com";The enableEmailChecked variable will tell us whether the checkbox to send an email is checked or not.
String enableEmailChecked = "checked";In case it’s checked, the value saved on the inputMessage2 should be set to true.
String inputMessage2 = "true";The inputMessage3 holds the temperature threshold value. By default is set to 25.0ºC, but you can set it to any other default value that makes more sense to you. You can also change it later in the HTML form.
String inputMessage3 = "25.0";
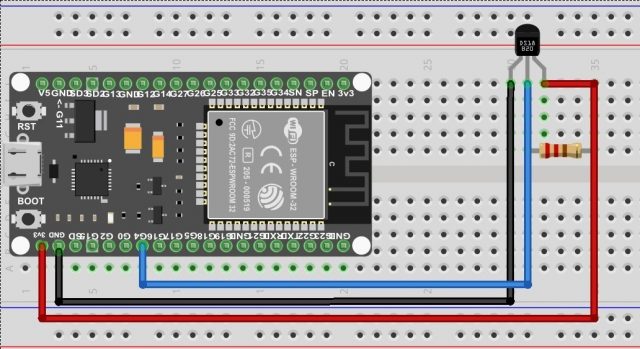
Circuit Diagram & Connections on Breadboard.
Connect the circuit, as shown below. connected 3.3, GND, and GPIO4 of ESP32 with VCC, GND, and Data pins of the sensor, respectively. Connect the micro USB cable with ESP32 and Connect another end of the cable to your PC.
Testing/Debugging
Come back to Arduino IDE, Go to tools, check the uploading configurations such as Board: ESP32 Dev Module, Uploading speed and make sure that you have selected right port. Then click on the uploading button.
When log shows like “Connecting ……..______ ……………” , hold the boot button of ESP32, until writing started.
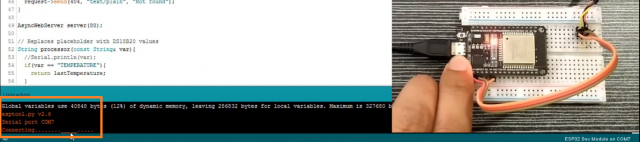
as soon as the writing started, release the button.
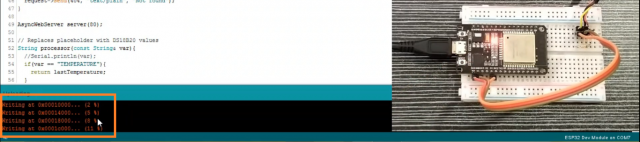
once the uploading is done, open the serial monitor. make sure baud rate of the serial monitor 115200 and click the reset button.
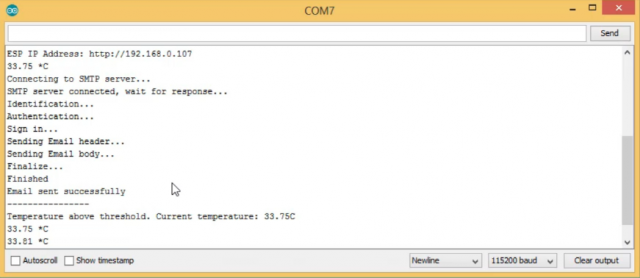
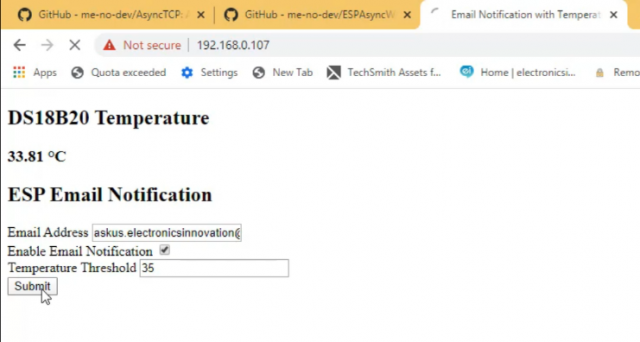
Here you can find the ESP Ip address to access the webserver where you can see the current temperature, and update the temperature threshold and Recipient email address.
Here you can also see the Current Temperature and Some logs about the mail communication for debugging.
Open your favourite browser, Key in the ESP Ip address, and click on the enter button. A similar web page should load with the default values.
If you change the temperature Threshold and click on the submit, if the temperature is below or above the threshold, a mail with appropriate mail body content will be sent to the Recipient mail. you can see in the below picture I have received two emails. first one is saying that the temperature is above the threshold and the second one is saying the temperature is below the threshold because I have updated the temperature threshold two times with different thresholds as above and below the current temperature.

Likewise, we can send email alert based on the Threshold Temperature and update recipient email address, temperature threshold wirelessly. If the temperature is above or below the Threshold, This ESP32 will send an appropriate alert Email to the programmed recipient email.
[…] Email alert based on temperature threshold with ESP32 […]
Can you show me how to have the temperature sent in a email every day at a specific time.
Please reach us on askus.electronicsinnovation@gmail.com