Table of Contents:
Overview:
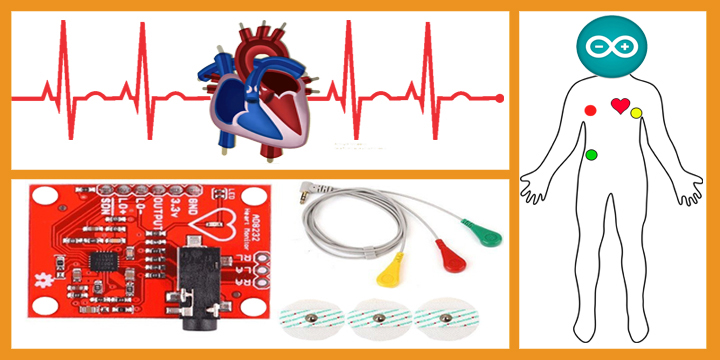
Heart diseases are a big threat for human beings for the past few decades, many people are dying because of heart problems. It is considered as one of the major problems in the current biomedical Industry. By analyzing or monitoring the ECG signal at an initial stage, heart diseases can be identified and prevented. This video is all about a heart monitoring system with Low-Cost AD8232 ECG based module using Arduino.
You can watch the following video or read the below article for more details.
The AD8232 is an integrated signal conditioning block for ECG and other biopotential measurement applications. It is designed to extract, amplify, and filter small biopotential signals in the presence of noisy conditions, such as those created by motion or remote electrode placement. This design allows for an ultralow-power analog-to-digital converter (ADC) or an embedded microcontroller to acquire the output signal easily.
So in this project, we will interface AD8232 ECG Sensor with Arduino and observe the ECG signal on a serial plotter or Processing IDE.
Required Components :
- Arduino Uno Board Buy from Amazon
- AECG Module AD8232 Buy from Amazon
- ECG Electrodes – 3 pieces Buy from Amazon
- ECG Electrode Connector -3.5 mm Buy from Amazon
- Connecting Wires Buy from Amazon
Before going to interface AECG module AD8232 with Arduino, Let’s see the theory behind the Electrocardiogram & How the heart will pump the blood to the whole body.
The right side of the heart receives venous blood from the body through the superior and inferior vena cava which entered the right atrium. blood flows through the tri custard valve into the right ventricle. Blood leaves the right ventricle through the pulmonary valve into the main pulmonary artery.

The pulmonary artery divides into right and left pulmonary arteries to transport deoxygenated blood from the right side of the heart to the right and left lungs. The pulmonary arteries branch further into the pulmonary cavalry bed where oxygen and carbon dioxide exchange occurs.


The four pulmonary veins two from the right lung and two from the left lung carry oxygenated blood from the lungs to the left side of the heart. The oxygenated blood flows from the left atrium through the mitral valve and into the left ventricle and out through the aortic valve and into the aorta and to the body.


Electrical impulses originate in the Sinoatrial node located at the junction of the right atrium and superior vena cava. Each electrical impulses generated from the SA node travels through the right and left atrium causing the atria to contract. The impulse then travels to the atrial ventricular node A V node then to the bundle of hiss and finally through the right and left bundled branches of the ventricles causing the ventricles to contract.

Electrocardiogram(ECG):

The P wave of electrocardiogram represents atrial contraction. The PR interval is a measure of time from the onset of atrial contraction to the onset of ventricular contraction. The Q R S complex represents the complete depolarization of the ventricles,


The S T segment represents the complete depolarization of the ventricles. elevation or depression of this segment may indicate heart muscle ischemia


The Q T interval represents the complete depolarization and repolarization of the ventricles.
A prolonged Kutty interval is a risk factor for ventricular arrhythmias and sudden death.


Medical uses of ECG
An electrocardiogram can be a useful way to find out whether your high blood pressure has caused any damage to your heart or blood vessels. Because of this, you may be asked to have an ECG when you are first diagnosed with high blood pressure.
Some of the things an ECG reading can detect are:
- cholesterol clogging up your heart’s blood supply
- a heart attack in the past
- enlargement of one side of the heart
- abnormal heart rhythms
AD8232 ECG Sensor
The AD8232 is an integrated signal conditioning block for ECG and other biopotential measurement applications. It is designed to extract, amplify, and filter small biopotential signals in the presence of noisy conditions, such as those created by motion or remote electrode placement. This design allows for an ultralow-power analog-to-digital converter (ADC) or an embedded microcontroller to acquire the output signal easily.

The AD8232 can implement a two-pole high-pass filter for eliminating motion artifacts and the electrode half-cell potential. This filter is tightly coupled with the instrumentation architecture of the amplifier to allow both large gain and high-pass filtering in a single stage, thereby saving space and cost.
An uncommitted operational amplifier enables the AD8232 to create a three-pole low-pass filter to remove additional noise. The user can select the frequency cutoff of all filters to suit different types of applications.

To improve common-mode rejection of the line frequencies in the system and other undesired interferences, the AD8232 includes an amplifier for driven lead applications, such as right leg drive (RLD).
The AD8232 includes a fast restore function that reduces the duration of otherwise long settling tails of the high-pass filters.
After an abrupt signal change that rails the amplifier (such as a leadoff condition), the AD8232 automatically adjusts to a higher filter cutoff. This feature allows the AD8232 to recover quickly, and therefore, to take valid measurements soon after connecting the electrodes to the subject.
The AD8232 is available in a 4 mm × 4 mm, 20-lead LFCSP package.

Performance is specified from 0°C to 70°C and is operational from -40°C to +85°C.
Note:
This product is NOT a medical device and is not intended to be used as such or as an accessory to such nor diagnose or treat any conditions.
Circuit Diagram/Connection between Arduino and ECG Sensor AD8232
The AD8232 Heart Rate Monitor breaks out nine connections from the IC. We traditionally call these connections “pins” because they come from the pins on the IC, but they are actually holes that you can solder wires or header pins to.
We’ll connect five of the nine pins on the board to Arduino. The five pins you need are labeled GND, 3.3v, OUTPUT, LO-, and LO+.

AD8232 ECG Sensor Placement on Body
It is recommended to snap the sensor pads on the leads before sticking to the body, the closer to the heart, the better the measurement would be. The cables are color-coded to help you identify a proper placement.

Arduino Source Code/Program
void setup() {
// initialize the serial communication:
Serial.begin(9600);
pinMode(10, INPUT); // Setup for leads off detection LO +
pinMode(11, INPUT); // Setup for leads off detection LO -
}
void loop() {
if((digitalRead(10) == 1)||(digitalRead(11) == 1))
{
Serial.println('!');
}
else{
// send the value of analog input 0:
Serial.println(analogRead(A0));
}
//Wait for a bit to keep serial data from saturating
delay(1);
}
Uploading Sketch to Arduino:
Take a new Arduino sketch, Copy and paste the above code.

Select the Arduino UNO board from Tools>>Board>>Arduino/Genuino UNO

Select the port: Tools>> Port>> COMXX (Mine is COM16)

Tap on upload button:

Wait till the uploading process is done

Open Serial Plotter: Tools>> Serial plotter.

Observer your ECG waveform on the Serial plotter.
Here we have successfully interfaced AD8232 with Arduino and Derived the ECG waveform.

Let’s see the same values on the serial monitor. Here we are getting 3 digits no. These 3 digits no are plotted on the serial plotter according to the time.

This is all about Low-cost AD8232 based ECG & Heart monitoring system using Arduino.
Video Tutorial & Explanation:
If you find this project is helpful, and you feel that it is informative please share…
Thank you.
[…] one of my previous videos, I had gone through how we can make a low-cost ECG monitoring system with Arduino Board. but that project is purely based on offline. You can monitor the ECG signal only when you are […]
Hi there. Thank you for the detailed information. I wondering wondering if it is possible to display the serial plotter as ECG reading in numbers instead of waveform on 1602 LCD screen?