Table of Contents:
Overview:
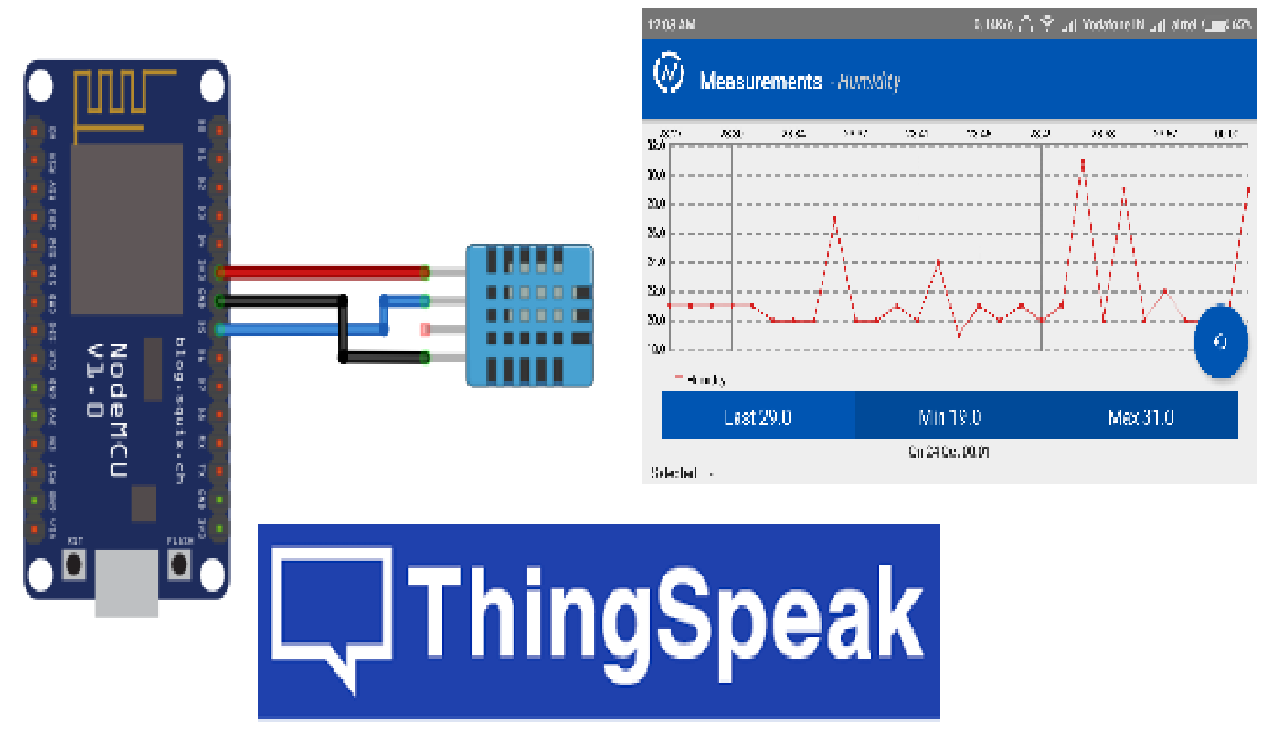
This tutorial is all about getting started with Thingspeak & Posting DHT22 data to the Thingspeak using NodeMCU, In this video, we will see how to get started with Thingspeak, what is Thingspeak, what we can do with the Thingspak, how to create a channel in Thingspeak, how to add widgets to the Thingspeak, what are the API keys, what is purpose of API keys and also you are going to know how to upload and store temperature and humidity data from DHT22 sensor on the cloud – ThingSpeak.com.
You can watch the below video tutorial for a better understanding of the clear process or you can continue to read the article.
Required Components:
1. NodeMCU
2. DHT22
3. Breadboard
4. Connecting wires
5.Data Cable
DHT22 Humidity & Temperature Sensor:
DHT22/DHT11 sensors are very popular for electronics hobbyists because there are very cheap but still providing great performance. Here are the main specifications and differences between these two sensors:
The DHT22 is the more expensive version which obviously has better specifications. Its temperature measuring range is from -40 to +125 degrees Celsius with +-0.5 degrees accuracy. The DHT11 temperature range is from 0 to 50 degrees Celsius with +-2 degrees accuracy.
The DHT22 sensor has a better humidity measuring range, from 0 to 100% with 2-5% accuracy. The DHT11 humidity range is from 20 to 80% with 5% accuracy.

The working principle and more detailed information about DHT22/DHT11 are available here.
Thingspeak:
ThingSpeak™ is an IoT analytics platform service that allows you to aggregate, visualize and analyze live data streams in the cloud. ThingSpeak provides instant visualizations of data posted by your devices to ThingSpeak. With the ability to execute MATLAB® code in ThingSpeak you can perform online analysis and processing of the data as it comes in. ThingSpeak is often used for prototyping and proof of concept IoT systems that require analytics.
At a high level, many IoT systems can be described using the diagram below, Thingspeak is the medium where it connects the smart devices and people.
 Source: thingspeak.com
On the left, we have the smart devices (the “things” in IoT) that live at the edge of the network. These devices collect data and include things like wearable devices, wireless temperatures sensors, heart rate monitors, and hydraulic pressure sensors, and machines on the factory floor.
In the middle, we have the cloud where data from many sources is aggregated and analyzed in real-time, often by an IoT analytics platform designed for this purpose.
The right side of the diagram depicts the algorithm development associated with the IoT application. Here an engineer or data scientist tries to gain insight into the collected data by performing historical analysis on the data. In this case, the data is pulled from the IoT platform into a desktop software environment to enable the engineer or scientist to prototype algorithms that may eventually execute in the cloud or on the smart device itself.
An IoT system includes all these elements. The ThingSpeak fits in the cloud part of the diagram and provides a platform to quickly collect and analyze data from internet-connected sensors.
ThingSpeak Key Features
ThingSpeak allows you to aggregate, visualize and analyze live data streams in the cloud. Some of the key capabilities of ThingSpeak include the ability to:
- Easily configure devices to send data to ThingSpeak using popular IoT protocols.
- Visualize your sensor data in real-time.
- Aggregate data on-demand from third-party sources.
- Use the power of MATLAB to make sense of your IoT data.
- Run your IoT analytics automatically based on schedules or events.
- Prototype and build IoT systems without setting up servers or developing web software.
- Automatically act on your data and communicate using third-party services like Twilio® or Twitter®.
I have explained clearly in the video about how to create a channel in Thingspeak, how to add widgets to the Thingspeak, what are the API keys, what is the purpose of API keys. It is a little bit difficult for me to turn all that information into the post. you can follow that video for clear information about Thingspeak.
Circuit Diagram:
The DHTxx sensors have four pins, VCC, GND, data pin and a not connected pin which has no usage. A pull-up resistor from 5K to 10K Ohms is required to keep the data line high. In order to enable the communication between the sensor and the Arduino Board. There are some versions of these sensors that come with breakout boards with a built-in pull-up resistor. They will have just 3 pins.
Here in the circuit diagram, I have Connected 3 pins to the 3 digital pins, in the program I have configured the pins to give 3.3v and GND. I followed this process to reduce the usage of the jumper wires because they will cause loose connections.

Setting up Thingspeak & Getting API Key.
- Go to https://thingspeak.com/ and create an account if you do not have one. Login to your account.
- Create a new channel by clicking on the button. Enter basic details of the channel. Then Scroll down and save the channel.
- Channel Id is the identity of your channel. Note down this. Then go to API keys copy and paste this key to a separate notepad file will need it later.
I have clearly explained this process in the video, you can refer for easy implementation.
Program/Source Code:
The program for Humidity & Temperature Monitoring using DHT11 & NodeMCU on ThingSpeak is given below.
- Copy this program and paste it on Arduino IDE.
- Download the DHT11/DHT22 library from GitHub and add it to your library manager.
- Select the NodeMCU ESP-12E board from the board manager.
- Paste your API Key from Thingspeak which you created earlier in the programming section line.
- Edit the program to change the wifi SSID and password with your own.
- Compile the code and Upload it to NodeMCU board
// Developed By M V Subrahmanyam
// Electrinics Innovation

#include <DHT.h> // library for getting data from DHT
#include <ESP8266WiFi.h> //Librarry connecting ESP8266 to connect with Wifi

// ***********************************************Thingspeak Credentials*****************
String apiKey = "SLI27J4O0FNEHNDL"; //Write API key of your ThingSpeak channel
const char* server = "api.thingspeak.com"; // API for thingspeak
//****************************************************************************************

const char *ssid = "subscribe to"; // Wifi SSID of your Internet connection
const char *pass = "electronicsinnovation"; // Password

#define DHTPIN D2 //pin where the DHT22 is connected
DHT dht(DHTPIN, DHT22);
WiFiClient client;
void setup()
{
Serial.begin(9600); // Serial monitor Baudrate
delay(10);
//******************PowerSupply to the Sensor**********************
pinMode(D1, OUTPUT);
pinMode(D3, OUTPUT);
digitalWrite(D1,HIGH);
digitalWrite(D3,LOW);
delay(1000);
//*********************************************************
dht.begin();

Serial.println("Trying to Connect with ");
Serial.println(ssid);
WiFi.begin(ssid, pass); // Connecting ESP8266 with Internet enabled Wifi with above mentioned credentials
while (WiFi.status() != WL_CONNECTED)
{
// If the connection was unsuccesfull, it will try again and again
delay(500);
Serial.print(".");
}
// Connection succesfull
Serial.println("");
Serial.println("WiFi connected");
}
void loop()
{

float h = dht.readHumidity(); // Reading Temperature form DHT sensor
float t = dht.readTemperature(); // Reading Humidity form DHT sensor
if (isnan(h) || isnan(t))
{
Serial.println("Failed to read from DHT sensor!");
return;
}
// Connecting to the Thingspeak API and Posting DATA
if (client.connect(server,80)) // "184.106.153.149" or api.thingspeak.com
{
// Format of DATA Packet "Write API Key&field1=Temperature data&field2=Humidity Data"
String postStr = apiKey;
postStr +="&field1=";
postStr += String(t);
postStr +="&field2=";
postStr += String(h);
postStr += "\r\n\r\n";

client.print("POST /update HTTP/1.1\n");
client.print("Host: api.thingspeak.com\n");
client.print("Connection: close\n");
client.print("X-THINGSPEAKAPIKEY: "+apiKey+"\n");
client.print("Content-Type: application/x-www-form-urlencoded\n");
client.print("Content-Length: ");
client.print(postStr.length());
client.print("\n\n");
client.print(postStr);
client.flush();
Serial.println(postStr);

Serial.print("Temperature: ");
Serial.print(t);
Serial.print(" degrees Celcius, Humidity: ");
Serial.print(h);
Serial.println("%.");
Serial.println("Data has been sussecfully sent to Thingspeak.");
}
client.stop();

Serial.println("Waiting to initiate next data packet...");

// thingspeak needs minimum 15 sec delay between updates
delay(60000);
}
Final Output & Results:
On every successful data upload, a success message is displayed on the serial monitor.

The output of this project is seen on Thingspeak, Open your channel at Thingspeak and output will be shown as mentioned ahead.

Video Tutorial:
hello sir, may I know what are DI and D2 as they are not declared thus making the code to have some errors I hope you can help me with this one. tq